Building a Spray Booth
I am fortunate in that I have a basement area to work
on models. While this gives me real
estate to set up my workbench, there is one serious flaw: this (though large)
enclosed area has no airflow. Any time I
wanted to spray primer or any paint from a can I had to don a respirator mask,
spray and then leave the basement. If I
did some serious spraying, such as with a primer, I would stink the whole house
up—the furnace and A/C are also in the basement, and invariably sucked up the
smell. I have wanted to build a spray
booth for some time, and finally got off my duff to do it.
A WORD OR TWO OF CAUTION:
I cannot guarantee my solution meets safety
standards. It is loosely based on U.S.
OSHA standards, but I make no claims that it is safe. It passes a common sense check, which means it may still be
unsafe. Any electrical wiring should be
done by someone qualified to do so.
This page is not intended to be used as instructions; to do so is at
your own risk.
Design Choices
The biggest hurdles I had were where to exhaust the
fumes and what to use for a fan. My
choices are based upon the situation, so I’ll take a minute to describe the
basement. In my basement, there are two
windows that open to the outside, but below ground level. The basement windows are in casement wells a
couple feet deep, and covered over with plastic rain guards. To run ducting outside, I either had to crack
the windows open and run the duct out, or completely remove the window and permanently
mount the duct in place. With my house,
the option of cutting glass and mounting the exhaust duct through the
window was not an option. I suspected
that the crack-a-window solution would result in filling the window wells with
toxic fumes that would simply spill back into the room. I ended up replacing the window with a heavy
plywood sheet I could cut up and mount the ducting to. The tight fitting sheet, sealed with
weather-stripping around the edges, gave me an airtight barrier between the room
and exhaust fumes. With the “where”
solved, I went on to “how”.
I have looked at a number of fans as possible
solutions. I planned on building a
sheet wood spraybooth to enclose the fan, making a sort of “wind tunnel” to
suck fumes out the back and through the duct.
As an engineer and former fluid mechanics instructor at a 4-year
college, I knew a house fan under 18 inches just wouldn’t move enough air, and
was a poor choice. Even larger house
fans (18 inch and up) would not perform well either—they are designed for free
flow, not ducted flow behind obstructions.
Since I was planning to enclose the fan, a larger fan meant a larger
enclosure, which meant a bigger hassle to make. How did I establish how much airflow was enough? Well, this is actually the first question
you gotta ask. Which means the zero’th
question is “How big a spraybooth do I need”?
The answer for me was in another question: What exactly does a spraybooth do? It catches the overspray of paint, sucks it out of the ambient
air and vents it. Therefore, a spray
booth only really needs to be big enough to catch the spray pattern of the
largest thing you spray—usually a large spray can, and contain the fan/blower
motor. That is the minimum requirement;
anything else is gravy. I added the
requirement that the booth should be big enough to park sprayed pieces in so
the can be vented as they dry (again, keep the fumes down). I do not reasonably expect to put a 1/72
B-52 or 1/48 B-1b in the booth (the latter would require a booth over 3 ft
wide…), but I would like to fit in subassemblies or whole smaller kits. The fan solution was one I kind of stumbled
on at Home Depot. I ran across the
oven/range hoods used to vent cooking fumes, and encountered a $69.99 model
that has an unducted max flow rate of 192 cfm, and also a light built in. I have read of other folks using the range
hood solution, and thought it made sense.
The range hood is designed to operate in an environment filled with
flammable particulates (cooking grease fumes in the air), and has a powerful
enough motor to work when ducted. A
recommendation based on OSHA guidance is that a vent fan should exhaust 100-200
linear feet of air per minute. The
linear feet number is found by dividing the fan flow rate in cfm by the spray
booth intake area in square feet. So,
for this 192 cfm fan, the largest opening the spray booth could have was 1.92
ft2. Realistically, this is
too big. There will be flow losses in
the ducting and filters that will decrease the cfm the fan can push. Additionally, the range hood has a 7”
diameter circular exhaust, which I wanted to decrease to 6” to fit the largest
flexible aluminum duct I could find.
This decrease in flow diameter will incur a minor loss in the cfm, which
is probably negligible. The real
problem from decreasing the flow area is the increase in airflow velocity. In simple terms, velocity increases with the
square of the diameter decrease; this simple decrease in area of 1 inch will
result in a 36% increase in airflow velocity.
Losses due to the duct increase with the square of the velocity
increase, so with this 1-inch diameter change, I just increased the losses by
85%! This is a very simplified example—actually,
as the velocity increases, the losses increase too, which means the total loss
would not reach 85%. The point is there
are no free lunches. I choose the
flexible 6” duct over a rigid 7” duct, which made mounting easier, but resulted
in a performance hit. . At some point,
I’ll solve the pipe flow energy equation or momentum equation to see how much I
killed the flow rate with the installation.
Assuming the losses incurred by the duct, the area
reducer, and the exhaust vent kill ~20% of the max rated cfm, I have a working
number of ~154 cfm to base my booth on.
For a 100 linear ft/min venting, I could make the max opening
14.8”x14.8”. This is a conservative
estimate, as 20% losses are probably too high.
The range hood is 30 inches at the back, and narrows down to 24 inches
at the front. My intent was to have the
booth side walls smaller than the hood so I could hang tools and my airbrush
off the outside. The opening area I
planned for was 17” wide by 13“ tall, which is more than larger enough to
contain the spray of a large can of automotive primer. Having bought the hood, the reducer, the
exhaust vent, clamps and the flexible ducting, I was ready to assemble the
exhaust system for my booth.
Construction: The Exhaust System
I wanted the air path from the fan to the window to be
as airtight as possible. Since this is
the pressurized part of the system, any leaks mean you are pumping the
exhaust right back into your work area.
I started by cutting a 6” diameter hole in the plywood sheet and then
screwing the exhaust vent in place. To
make the exhaust vent seal to the plywood, I poured spare (i.e. too crappy to
cast with) resin into the space between the vent tube and the plywood, then
sealed it further with tub caulking.  This
effectively sealed the vent in place, as well as permanently bonding the metal
and wood together. I did a similar
thing with the range exhaust and the 7” to 6” reducer pipe, except here it was
a bigger issue. The fan exhaust is a
simple ring of sheet metal that is buried inside the body of the hood. There was no good way to mechanically attach
(bolts, rivets, etc) the reducer to the hood without cutting a ton of sheet
metal, so I used resin again to glue/seal the pieces together. After the resin had cured, I was able to
connect the range
This
effectively sealed the vent in place, as well as permanently bonding the metal
and wood together. I did a similar
thing with the range exhaust and the 7” to 6” reducer pipe, except here it was
a bigger issue. The fan exhaust is a
simple ring of sheet metal that is buried inside the body of the hood. There was no good way to mechanically attach
(bolts, rivets, etc) the reducer to the hood without cutting a ton of sheet
metal, so I used resin again to glue/seal the pieces together. After the resin had cured, I was able to
connect the range 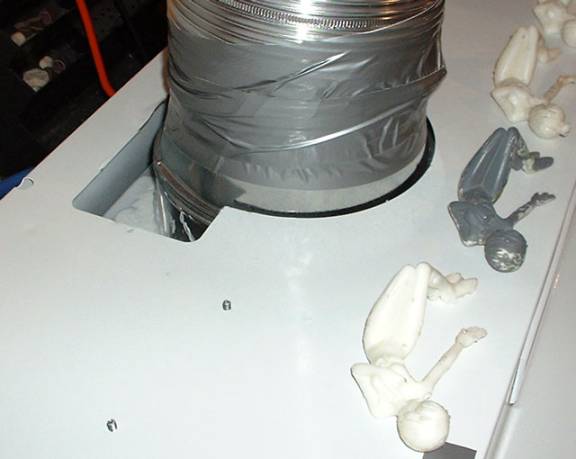 hood/reducer
to the window-mounted vent with the flexible hosing. In the picture to the right, you can see where some of the white
resin spilled out from underneath the reducer ring. The spillage was minimized by caulking where I could around the
ring to hold the liquid resin in place.
Yes, those are a bunch of 1/10 scale Rei Ayanamis on the hood. One other modification I made was removing
the plain metal mesh filter from the hood and replacing it with an interior
range hood filter. For places where you
can’t exhaust the air, the range hood has to recirculate the air it sucks
in. These types of installation require
a combination filter that has wire mesh, fabric and a charcoal filter. But, wait—won’t that mean your filter will
end up trapping all the junk you want exhausted outside? Kind of.
What the filter doesn’t trap will go outside (the vapors). What the filter does trap (paint
particulates and heavier stuff) will stay in the filter and still keep out of
my lungs. When the filter gets too
clogged, it gets tossed—and in the mean time it keeps my fan cleaner so it will
work longer/better.
hood/reducer
to the window-mounted vent with the flexible hosing. In the picture to the right, you can see where some of the white
resin spilled out from underneath the reducer ring. The spillage was minimized by caulking where I could around the
ring to hold the liquid resin in place.
Yes, those are a bunch of 1/10 scale Rei Ayanamis on the hood. One other modification I made was removing
the plain metal mesh filter from the hood and replacing it with an interior
range hood filter. For places where you
can’t exhaust the air, the range hood has to recirculate the air it sucks
in. These types of installation require
a combination filter that has wire mesh, fabric and a charcoal filter. But, wait—won’t that mean your filter will
end up trapping all the junk you want exhausted outside? Kind of.
What the filter doesn’t trap will go outside (the vapors). What the filter does trap (paint
particulates and heavier stuff) will stay in the filter and still keep out of
my lungs. When the filter gets too
clogged, it gets tossed—and in the mean time it keeps my fan cleaner so it will
work longer/better.
Construction: The Booth
 OK,
I cheated at first. Another reason I
took so long on building a booth was I couldn’t decide on the design. Should it be collapsible, since I move every
2-3 years? Should it be a simple box or
should it converge to the rear? I
settled on a collapsible box shape. I
had purchased 3 2’x4’ 1/8” plywood sheets for ~$12 to build the box. In order to complete the basic booth super
quick, I used the cardboard box the range hood came in to make the booth. The obvious advantage here is speed. A not-so-obvious advantage is once I had the
booth shape I liked, I now also have templates to cut the wood with! One serious disadvantage is the cardboard
booth is very flimsy compared to wood, and is hard to seal up airtight. Another disadvantage is when you want to use
one of these cardboard templates to make the wooden walls--you have to pull it
out. The cardboard walls are slightly
more stable than a house of cards when all three were in place; pulling one out
causes instability and collapse. On
more than one occasion the weight of the hood was supported entirely by the
aluminum ducting as the whole thing fell apart. I was reassured that the resin and
OK,
I cheated at first. Another reason I
took so long on building a booth was I couldn’t decide on the design. Should it be collapsible, since I move every
2-3 years? Should it be a simple box or
should it converge to the rear? I
settled on a collapsible box shape. I
had purchased 3 2’x4’ 1/8” plywood sheets for ~$12 to build the box. In order to complete the basic booth super
quick, I used the cardboard box the range hood came in to make the booth. The obvious advantage here is speed. A not-so-obvious advantage is once I had the
booth shape I liked, I now also have templates to cut the wood with! One serious disadvantage is the cardboard
booth is very flimsy compared to wood, and is hard to seal up airtight. Another disadvantage is when you want to use
one of these cardboard templates to make the wooden walls--you have to pull it
out. The cardboard walls are slightly
more stable than a house of cards when all three were in place; pulling one out
causes instability and collapse. On
more than one occasion the weight of the hood was supported entirely by the
aluminum ducting as the whole thing fell apart. I was reassured that the resin and 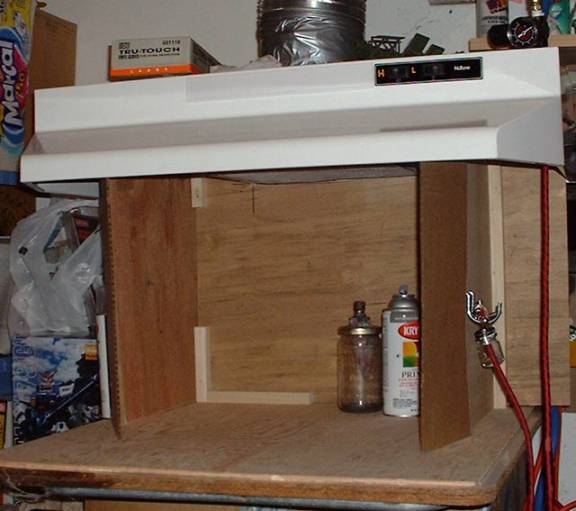 duct
tape I used to attach the range fan outlet to the duct was very solid;).
duct
tape I used to attach the range fan outlet to the duct was very solid;).
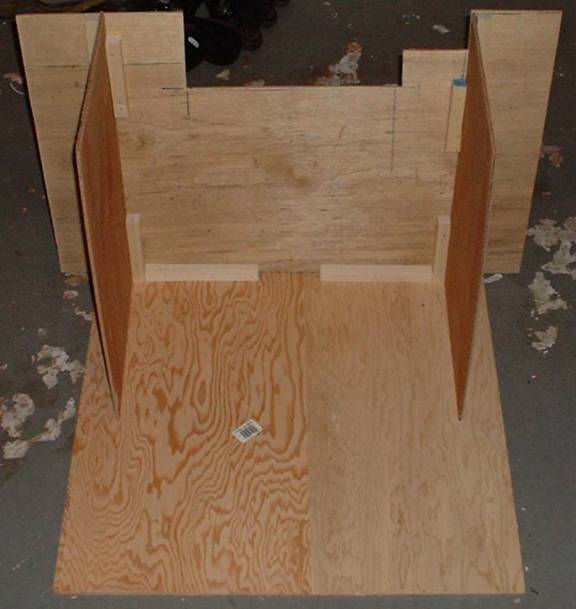
Since I wanted a booth that could be broken down, I
made slots from 1”x1” strip pine on the back wall for the sidewalls to slide
into. The back is slides into guides
made with the pine strips on a 2’x2’ plywood sheet. Since the strips are glued and screwed into place, they not only
lock the walls in place but provide an airtight seal around the booth. To disassemble: Pull the sidewalls straight out and the back wall straight
up. Despite being designed to break
down the walls and floor are very solid, especially when capped with the
hood. The completed booth is shown on
the right with cardboard front flaps (wooden ones to follow). Pegboard hooks were used to make an airbrush
holder, and in the very upper right of the picture you can see the regulator
for the air supply. The top of the
range hood will have a tray to hold airbrushing supplies such as the bottles
and color cups, respirator, latex gloves, etc.
Performance
Proof is in the pudding. I fired up the fan a got one of the two nastier smelling full
size primer spraycans I normally use. I
blasted it into the booth, and the results were in. I sprayed for about 30 seconds, enough to get the back wall of
the booth showing primer. At the immediate
vicinity of the booth, there was a faint odor of primer. This odor though was not as strong as the
smell of fresh duct tape I had used to seal up the ducts! From about 5 feet away on either side of the
booth, there was no paint smell at all.
With the amount I sprayed, I normally would have had to leave the
basement for several hours so the fumes would die down. With the booth, in a few minutes there was
no smell at all. I have since used it
to spray Testor’s Dull Coat lacquer.
The largest source of odor now is if I leave the spray can out of the
booth after I finish spraying—the drips around the nozzle cause the odor. If I park the spraycan in the booth with the
drying parts, there is no odor. So,
for about $115 total, I now have a spraybooth that is larger and can be broken
down more easily than any commercially made booth costing twice as much or
more.
If you found this page useful, e-mail
me with you comments!