Foot
Surgery (A happy accident):
I had just returned my 1:100 Altron to its
shelf above my wife’s dresser. It was
still in an action pose (essentially same as the photo to the 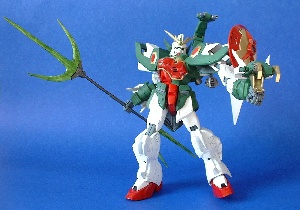 right),
which meant it was a bit off balance. I
thought I had it tilted so if disturbed, it would fall back against the
wall instead of taking a header off the shelf.
I was wrong. When I came back
later that day,
right),
which meant it was a bit off balance. I
thought I had it tilted so if disturbed, it would fall back against the
wall instead of taking a header off the shelf.
I was wrong. When I came back
later that day,  Altron
was in several pieces on the dresser. I
immediately rushed it to my “emergency” room, and began to clean up the
(thankfully) minor paint damage. While
it was apart, I decided to make a mod I had been planning on for some time, and
one I had picked up from a B-Club conversion—double ball ankle joints. The cause of the fall was due in part to
the floppy knee joints Altron suffers from and also to the lack of good foot
balance. As can be seen, the left foot
is barely in contact with the ground—only the inside edge of the foot is
keeping this guy up. Even with the
offset ball joint on the foot, ankle mobility is not good. The kit is indeed leaning backwards in this
photo, just to keep from pitching over into a face plant. I had ordered some Kotobukiya #111B double
ball joints from HLJ
a month ago, and figured now was a good time to use them.
Altron
was in several pieces on the dresser. I
immediately rushed it to my “emergency” room, and began to clean up the
(thankfully) minor paint damage. While
it was apart, I decided to make a mod I had been planning on for some time, and
one I had picked up from a B-Club conversion—double ball ankle joints. The cause of the fall was due in part to
the floppy knee joints Altron suffers from and also to the lack of good foot
balance. As can be seen, the left foot
is barely in contact with the ground—only the inside edge of the foot is
keeping this guy up. Even with the
offset ball joint on the foot, ankle mobility is not good. The kit is indeed leaning backwards in this
photo, just to keep from pitching over into a face plant. I had ordered some Kotobukiya #111B double
ball joints from HLJ
a month ago, and figured now was a good time to use them.
The mod plan was
simple—cut off the ball joint on the foot, add a ball socket, then reattach the
foot to the kit with a double ball joint (left), using the existing ball socket
in Altron’s lower leg. I started by
clipping off the foot ball, and then drilling it out with progressively larger
drill bits. 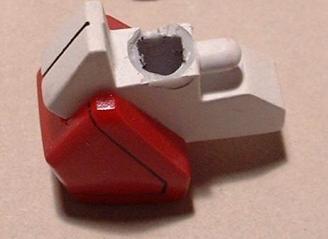 I wanted the hole to be large enough to
slightly countersink the socket. If you
want to bury the cup even deeper into the foot to keep the same height, it
wouldn’t be a problem. But since this
kit was already painted and finished, I didn’t want to take too many chances
with the paint on the foot sides.
I wanted the hole to be large enough to
slightly countersink the socket. If you
want to bury the cup even deeper into the foot to keep the same height, it
wouldn’t be a problem. But since this
kit was already painted and finished, I didn’t want to take too many chances
with the paint on the foot sides.
The next step was to
attach the cup portion of the ball joint to the foot. The Kotobukiya joints are made of ABS plastic, which like the
Bandai PV caps, can’t be glued well to styrene. To fix the cup, I needed an anchor to mechanically hold it in
place whether the 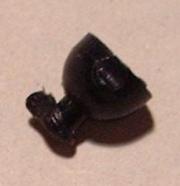 glue
worked
or not. Using my trusty lighter, I
slightly singed the end peg and smooshed it into a shape that would give me the
anchor needed. I then completely filled
the interior of the heel section with superglue/talcum powder (SGT). After putting the cup in anchor down, the
SGT will completely fill in around the anchor, totally locking the joint in
place.
glue
worked
or not. Using my trusty lighter, I
slightly singed the end peg and smooshed it into a shape that would give me the
anchor needed. I then completely filled
the interior of the heel section with superglue/talcum powder (SGT). After putting the cup in anchor down, the
SGT will completely fill in around the anchor, totally locking the joint in
place.
There were two major
problems remaining: The Kotobukiya
double ball joint is too loose in the Bandai ankle socket, and the double ball
joint is too tall, which would give Altron a very exposed, odd looking
ankle. To get around that, I
scratchbuilt my own double ball joints.
The first step was to completely fill the kit ankle joint cup with
SGT. Since the kit cup is PV, it acts
as a mold for the SGT, which I took out 10 minutes later. One trick here for strength and ease
debonding: put a wooden toothpick into
the SGT as it is setting up. This gives
you something to grab to help pull it out, but also gives the SGT a bit of
strength. The toothpick was trimmed
down to as long as I wanted the foot side ball to be and then stuck into
the111B joint cup filled with liquid SGT.
When 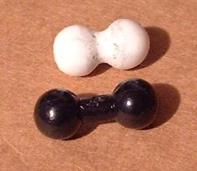 the
SGT is dried, you have a complete, well bonded, and tough double ball
joint. The homemade double ball joint
was carved and sanded into a figure 8 so it could give better flexing. The finished homemade joint and the original
joint are shown side by side for comparison.
You may find that using the joint cup for a ball joint
the
SGT is dried, you have a complete, well bonded, and tough double ball
joint. The homemade double ball joint
was carved and sanded into a figure 8 so it could give better flexing. The finished homemade joint and the original
joint are shown side by side for comparison.
You may find that using the joint cup for a ball joint 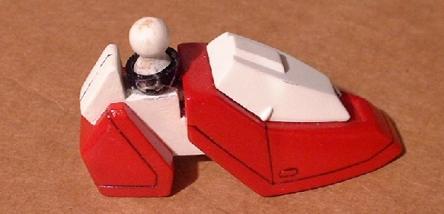 master
mold gives you a slightly loose joint—the ball should actually be a little
bigger than the size of the cup. A
quick fix is to apply clear nail polish to the ball until it is sufficiently
tight. A longer term fix is to take the
ball and spray a ton of paint (in multiple coats!) on it, building up the size
of the ball. You can then make RTV
molds and resin copies of the joint.
Either way works. The finished
foot is shown to the right (make sure to put the slightly smaller ball into the
foot side cup—test fit on the leg side first).
There was minimal visible damage to the foot from the drilling, which is
easy to touch up, but also covered by the lower leg. Now the whole unit can be plugged back into the lower leg.
master
mold gives you a slightly loose joint—the ball should actually be a little
bigger than the size of the cup. A
quick fix is to apply clear nail polish to the ball until it is sufficiently
tight. A longer term fix is to take the
ball and spray a ton of paint (in multiple coats!) on it, building up the size
of the ball. You can then make RTV
molds and resin copies of the joint.
Either way works. The finished
foot is shown to the right (make sure to put the slightly smaller ball into the
foot side cup—test fit on the leg side first).
There was minimal visible damage to the foot from the drilling, which is
easy to touch up, but also covered by the lower leg. Now the whole unit can be plugged back into the lower leg.
Results!
Comparing the original to modified foot in a
normal pose. Modified ankle on right;
the new ball joint adds about 1-2 mm of height to the leg, depending on how it
is posed.
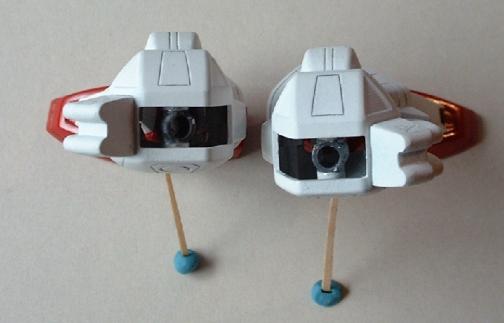
This
photo shows the original and modified leg at maximum side deflection. In both cases, the feet are flat on the
ground, and the heels are aligned. The
toothpicks were required to keep the new foot/leg from toppling over.
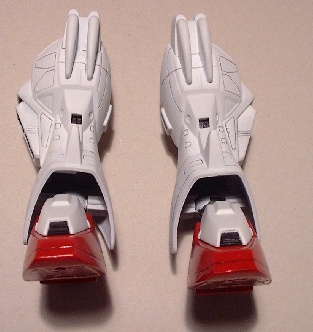
Original to new ankle posing (similar poses); note how much better the modified feet plant.

Modified
Altron Gallery (a selection of poses. > 100 kb):
Pose 1 Pose 2 Pose 3 Pose 4 Pose 5