Bandai’s 1/100 Gundam Wing
DeathScythe Hell Review and Photos
Overall: This kit is
probably one of the simplest HG kits in the 1/100 Wing line. The body breaks down into basic
components: upper & lower torso,
upper & lower arms, upper & lower legs, head and rocket pack. The only gimmick for DSH is the "Active
Cloak", or the trademark bat wings.
The weapon included with the kit, the "Beam Scissors" or
"Beam Scythe", is ridiculously huge and badly balanced in its plastic
form. At first glance, and judging from
the pictures on the side of the box, this kit looks ridiculously bulky with the
wings in the down position. However,
seeing the completed model in three dimensions has changed my impression. Especially compared with the screen shot of
DSH with the active cloak bat wings closed available at http://pictures.gundamw.net/ep38pics.html,
the plastic captures the form of DSH extremely well. The only major complaint I have about this kit is how the bat
wings are mounted to the shoulders--more on that later.
This kit
follows the standards seen in the other Gundam Wing HG kits. All parts are molded in color, as they
should be, except the white parts are light gray and the black parts are
different shades of dark blue. There is
a mix of trim parts such as thrusters, the hands the rocket backpack etc. that
are molded accurately in various shades of dark or grays. Again knit lines are present in some of the
larger parts such as the wings in shoulder armor, but they are not extremely
obvious. The ejector pin marks on the
double-sided pieces such as the bat wings are generally shallow and easy to fix
with putty or white out. The hip armor
skirt is undetailed as usual for these kits but this is not as big a problem as
with the Altron kit, for example. Since
the hip armor pieces are very deeply engraved, the engraving pattern from the
outside is visible on the inside of the skirt.
This gives the appearance of any internal framework which when painted
black is very passable. This kit does
not suffer from extensive hollow parts, with the exception of the spike on the
Buster Shield and the "Peter Pan" toe spike things. The PV caps are also typical of a Wing HG
kit; the knees are fairly concealed, though not as well as Altron. In the few lunging poses DSH can get into,
the knee PV and pegs are actually visible.
The elbows are totally exposed, as usual for an HG kit. The batwing mounting block PV caps are
exposed; however I don't consider it worth the trouble to try and hide them.
Arms: There is nothing special about the arm construction
for this kit. The lower arm has the
typical ball socket for the hand and a pivot joint at the elbow. The upper arm has a lower PV pivot joint and
an upper PV receiver for the torso arm mounting peg. The white upper arm is trapped between the two black shoulder
halves, and should be painted prior to assembly. The upper arm to shoulder connection is plastic on plastic hinge,
and probably should have a buffer such as Teflon tape between the plastic
pieces to prevent excessive wear. On my
kit, the upper arm/shoulder hinge is so tight I have a lot of trouble
positioning the arm away from the body due to painting the upper arm prior to
assembling the shoulder halves. Like I
said, this kit is about as simple as a 1/100 HG Gundam Wing kit can get. And as expected for this series, the hands
are pretty lame.
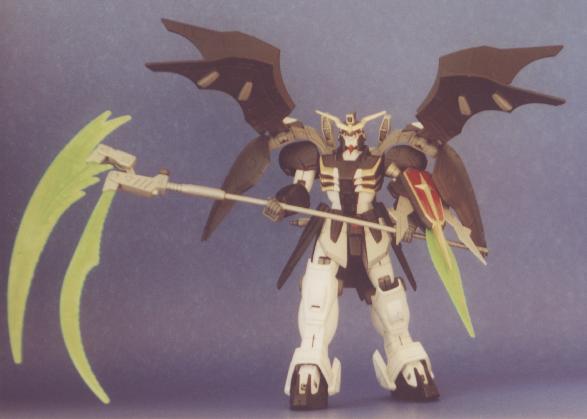
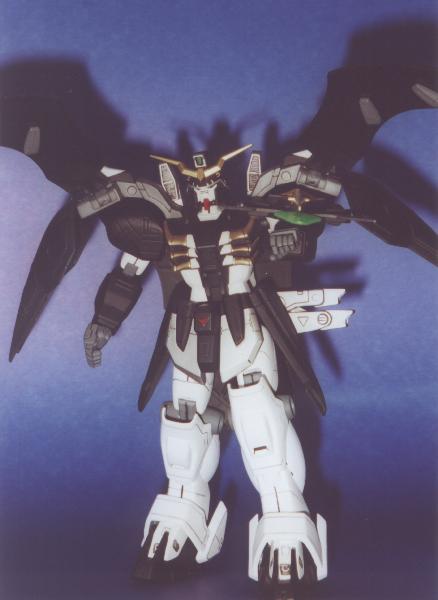
Active Cloak: DSH's signature feature is the bat wing like
active cloak panels. When fully spread,
it gives Duo's ride a demonic demeanor.
My main complaint about this kit is how the active cloak panels are
attached to the kit. Rising up out of
the torso between the neck and a shoulder joint is a curved beam, which is a
mostly accurate copy of the Anime DSH.
One particular detail that will drive the glue and putty crowd crazy on
this beam are the small twin triangular fins on the torso side of the
beam. Due to the draft angle (this is a
model production term used to describe the surfaces that are perpendicular to
the main surface of the mold) the small triangular fins have a serious mold
line and undercut problem. When the
beam is assembled, the space in between the small triangular fins has a large
depression which is hard to sand because the small fins are in the way. The good news is the small fins are not
actually on the animated version. So,
cut them off and putty to your hearts content.
This beam can
pivot slightly in and out from the head.
At the end of the beam is a box that measures 3/4 of an inch by 3/4 of
an inch square, and about 3/8 in. high.
This box has three PV pivot joints for the front and back bat wings and
the side shoulder guard. The problem is
this box is huge! Though it is hard to
see in the Anime, you don't really get the impression that DSH's bat wings are
hanging off a huge, rectangular block.
The animated version seems to be much more graceful and slender. Since such silly things as reality or
building a physically realistic object do not limit the animators, they can get
away with it. Unfortunately, Bandai had
to come up with something that would physically realize the bat wings and still
maintain the cost and level of detail seen in HG kits. I'm not sure this is the best they could've
done. I look that shaving down the box
dimensions, but with the PV pivots supplied there really isn't much room for
improvement without some major surgery.
Since I was more interested in finishing this puppy pretty much out of
the box (and quite frankly it's not my favorite kit in the series), I left the
boxes as they are. If I get bored I
might go back and rebuild the boxes to be a little more slender.
One question
I had about the kit was the ability to pose the bat wings. On the box pictures, the wings are seen
basically locked closed or straight up when open. In the anime, the wings actually never point straight up when
open—they point out to he side noticeably.
This pose can be done easily by raising the wings about halfway so they
stick straight out front. With the wing
tips pointing right at you, rotate the wings on their pegs a few degrees
so the inside edge of the wing goes up and the scalloped edge goes down. When you raise the wings the rest of the
way, they will not be able to extend all the way up, but will point out more
instead of up.
Legs: The feet assemblies are one of the more
complicated bits on the kit. The feet
are made up of 2-part sole including heel with a ball joint, a foot topper and
a pivoting ankle guard. They buildup
cleanly, however there is a color problem.
On the back of the sole part there is a vertical block that should be
dark gray, not black like the rest of the foot. This can easily be hand painted after the sole is assembled and
painted black, with a panel line pen to clean up where the colors meet (gotta
love a black kit!). Prior to gluing the
sole together, it might be worthwhile to fill in the hollow toe spike (which
remind me of foofy medieval curly toed shoes--DeathScythe Custom even more
so!). I wouldn't use styrene here, as
the two spikes are so close together the extra thickness would be
noticeable. I ended up using Milliput;
again it's too deep to use a solvent type filler here. The foot soles have a poor mating surface,
which results in a fair amount of work to make decent. This is typical of the 1/100 GW kits I have
seen--the mating surfaces on the foot soles are slightly concave, leaving a
nice canyon right down the middle. I
just grind all the detail off, then use sheet styrene to scratchbuild the
simple geometric shapes.
After the
soles are built and painted, the rotating ankle guard can be put on. I assembled mine, then masked the black
foot. The ankle guard can be a bit
tricky to get on evenly; you might do better by removing the locator pins and
just gluing it. My sample took some
putty work and panel line scribing to get looking decent. After it is cleaned up and painted, the foot
topper can be painted and plopped on easily--no glue required. The detail on the side of the foot topper is
mushy, a victim of draft angle. The
ankle joint looks fairly exposed when the foot is off, but between the rotating
ankle guard and the gray block on the back of the sole, this is one of the best
concealed HG ankles I’ve seen.
The calves
are straightforward; the 2 halves trap the ankle and lower knee PV caps. My sample only required putty to cover sprue
scars. The kneecap armor plates fit on
cleanly. I suggest leaving them off
until after painting, since getting around the plates with a spray can or
airbrush is not terribly practical.
The knee blocks and upper legs are practically identical to
the other GW 1/100 kits. The knee
blocks cover the PV caps nicely, and have decent flexibility. However, the opening in the front of the
thigh is cut too high, and when the knee is near maximum bending, the PV joint
is visible. I realized this too late to
spend time correcting (I suspect you would have to relocate the PV hinge to the
rear of the thigh--MAJOR surgery). The
knees can bend up to ~75°, though you may not want that much "leg"
showing. The hip armor is also typical;
independent front skirts on ball sockets, independent hinged side plates and a
fixed rear plate. The fixed rear plate
is a real problem, unlike Altron. I am
unable to get DSH into a good lunging scythe swing pose because I can not pose
the rear leg back far enough to balance the kit. The good news is that even with the active cloak wings, DSH is
very stable in the few poses he can strike.
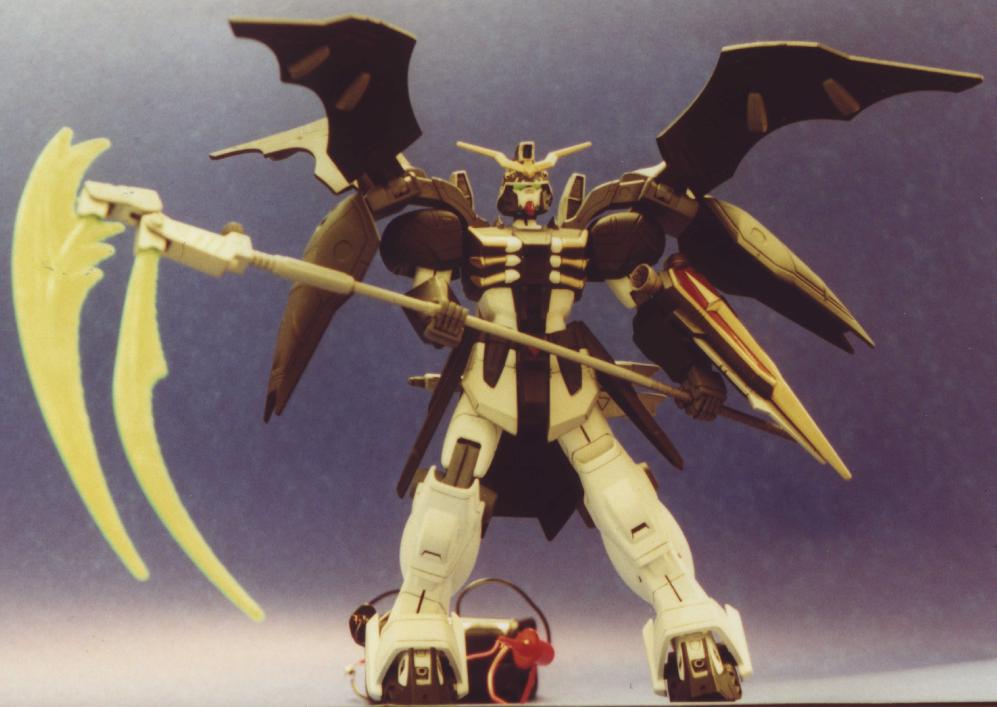
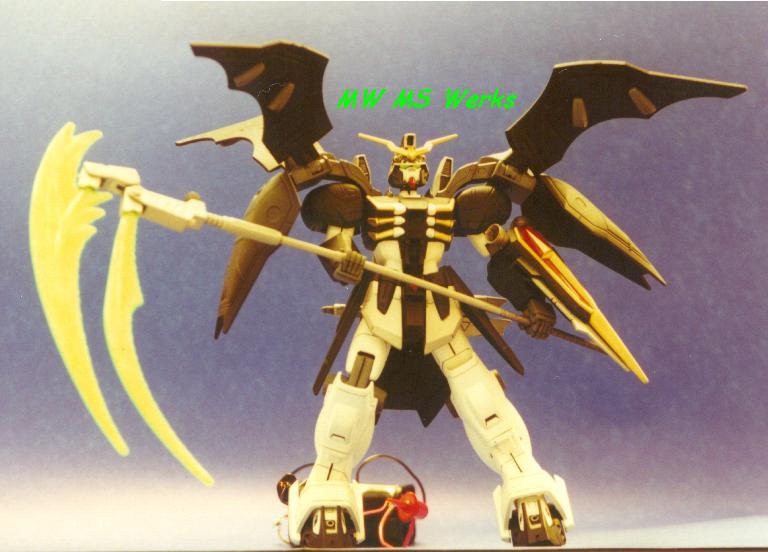
Weapons: DSH is on the
short range side of GW mecha. Only
Epyon or Sandrock come to mind as having less reach. DSH is armed with essentially three weapons: A double beam scythe, head Gattling cannons,
and a shield with crusher claws and a beam blade. The longest reaching of these is the shield, which can either
crush the enemy with the large claws, or slice with a rather large beam
blade. DSH can either swing it as a
melee weapon, or shoot it off his left arm--it has rocket motors (this
immediately should bring images of "Giant Robo Rocket Fists", but it
isn't THAT cheesy). I am fairly certain
the head Gattlings are used in the anime, but its nice to know they're there.
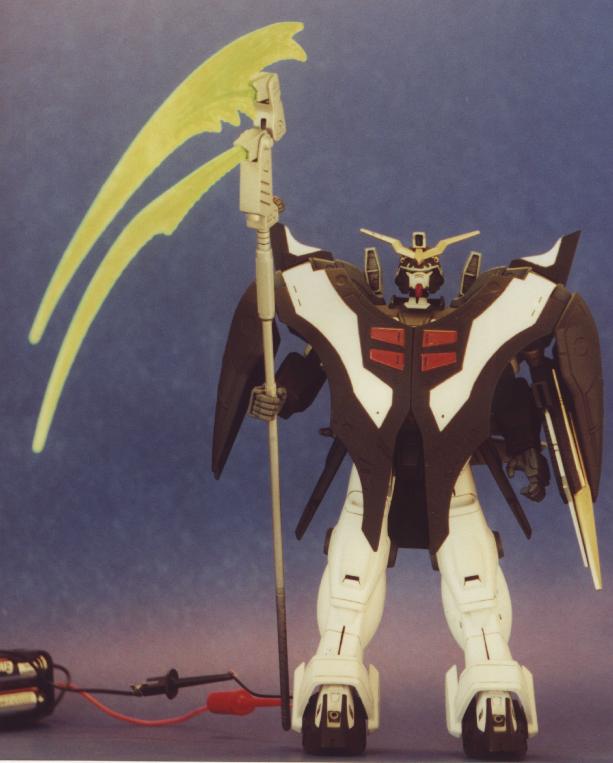
DSH's
signature hand weapon is the "Beam Scythe" or "Beam
Scissors". The DSH beam scythe is
different from the regular DeathScythe by having two parallel beam scythe
blades. Apparently having one blade
that can cut through anything like butter wasn't quite enough. When assembled, it bounces between looking
really menacing and really stoooopid.
When I decided between the earlier and later incarnation of DeathScythe,
one of the deciding factors was the Scythe.
It’s the times I remember that decision I like the double scythe. Like the Altron 1/100 kit, DSH includes
both an extended, full length Scythe and one that is neatly folded (with the
staff portion gone--just the beam holder).
The neatly folded one can be stored on a brace on the rear hip armor
skirt. The folded up one in no way
could possibly extend the length of the full size one--another bit of GW
techno-magic.
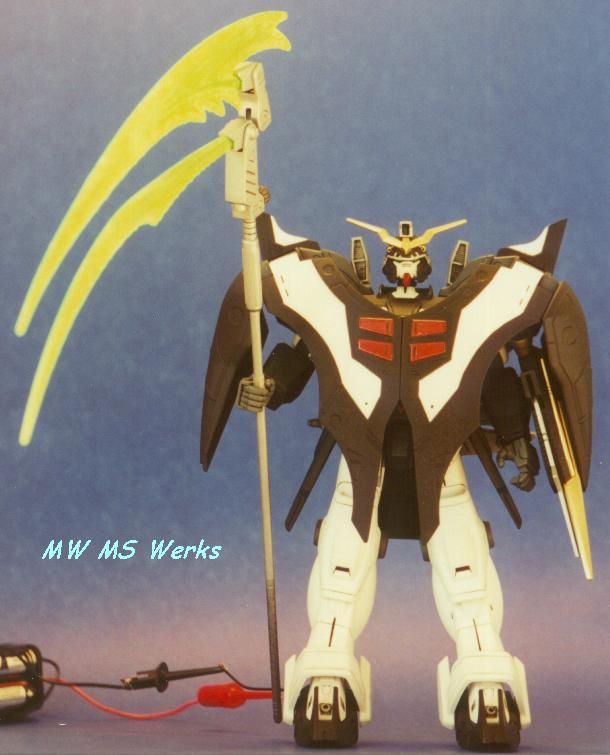
The scythe
itself is well articulated. The inner,
shorter beam plugs into a simple pivot mount, which allows you to position the
blade anywhere from straight out from the staff to in line with the staff. The outer blade mounts to a similar rotating
plug. The outer plug in turn is connected
to the main staff by a link which allows you to move the outer blade up or down
relative to the lower blade. You can
even fold the head of the scythe up to match the stowed version. Kind of neat. I used liberal Teflon tape to stiffen up all the rotating and
linked components--the beam blades are somewhat heavy, and you don't want
droop. The scythe also has a charming
little rocket motor on the beam holder portion. I guess that is so you can REALLY whack a Leo with a Beam
weapon...
The crusher shield
is pretty well done. The claws are
internally geared to open and close together.
Take the time to fit the claw gears both ways. On my sample switching the claws to the other side meshed the
gears so they would close all the way properly. The claw portion is separate from the decorated gold and red top
plate, so painting is a breeze. I
painted the claws Testor's non-buffing steel, then dullcoated them for
protection. I also sanded the inside of
the claw housing so the blades would clear without scraping the paint off when
opened and closed.
The gold and
red top plate has a spike sticking out of it, which is unfortunately
hollow. A little sheet styrene fixed
that fin. I painted the top plate dark
red first, then brushed Testor's bright brass on for the gold cross and
trim. Any minor errors disappeared
under my Micron Pigma pen. A quick
note: the side "wings" on the
shield have some engraved detail that the box pics and sticker sheet show to be
red with gold trim. My study of
numerous screenshots from http://pictures.gundamw.net
and episodes show these wings are plain black.
I choose to leave them black too (heck of a lot easier!).
The rocket
exhausts in the rear of the shield are plain affairs, and plug into the rear of
the shield. Unfortunately, the plug
they attach to is highly visible when viewing the shield from the rear. On the plus side, there is so much armor in
the way it is next to impossible to see the rear of the shield anywho.
The Beam
portion of the blades on the scythe and the rocket shield are made of a soft,
translucent green plastic. This is
similar to the softer stuff the other colored beam parts I've seen, so I
suspect its all the same stuff.
Straight off the tree, the blade looks horrible. Its has some wavy edges and
"flame" details on the surface, but in no way looks like a uniform
sheet of energy.
If you try to
clean these parts up with sandpaper or X-acto knife, you end up with ugly scars
and scratches on fake looking clear plastic.
I accidentally came up with a solution I liked when removing excess
paint from the soft green plastic of the eyes.
I was using a toothpick dipped in brush cleaner to scrape the paint
away, and realized I was tearing up the eyes!
I quickly
switched to rubbing alcohol, but realized this may work on the beam
blades. I took the blade for the shield
and dipped it in acetone. About ten
seconds or so--don't leave overnight.
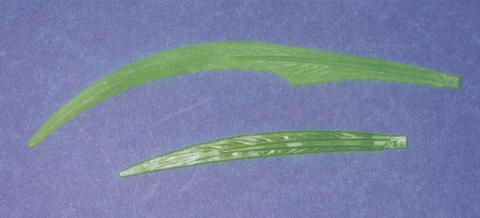
This will instantly "fog" or craze over the clear green, but
it will still stay translucent. Now
when light hits the beam blade, the whole blade will softly glow (instead of
just the edges glowing). If you look at
the pictures in the instruction manual, this look is a lot closer than the
clear glossy look it has straight off the parts tree. In the picture below, the upper blade has been crazed; the lower
is a regular unmodified blade.
 Note:
Not all of the green will craze.
For some bizarre reason, some small patches of the blade will not be
affected by the acetone. To make the
whole thing craze evenly, dip an old sock into the Acetone and rub it into any
areas that are still glossy. Place the
beam blade on a hard flat surface not affected by acetone, since rubbing it
with acetone temporarily weakens the blade and can cause it to break. Once the Acetone dries, the blade will be
back to normal strength, maybe a little harder.
Note:
Not all of the green will craze.
For some bizarre reason, some small patches of the blade will not be
affected by the acetone. To make the
whole thing craze evenly, dip an old sock into the Acetone and rub it into any
areas that are still glossy. Place the
beam blade on a hard flat surface not affected by acetone, since rubbing it
with acetone temporarily weakens the blade and can cause it to break. Once the Acetone dries, the blade will be
back to normal strength, maybe a little harder.
Yes, the
acetone chews up the beam blade plastic, and as you rub the acetone soaked sock
into the blade, it will grind up the blade a LITTLE. However, this also helps get rid of those pesky injector pin
marks. And if you trim down the ejector
pin marks before dipping, they disappear altogether. If you have any doubts, try it on an old blade or piece of
sprue. With a little practice, you can
control the amount of crazing and get a really nice glowing blade effect.
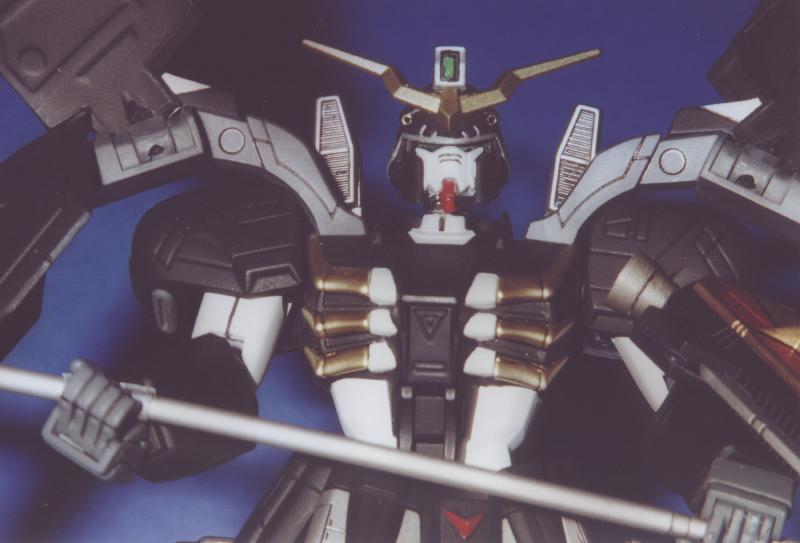
Miscellaneous: The
head of the kit, like Altron, is one of the real strong points. It captures the lines, is well detailed, and
paints up great. At certain times it
almost looks too small, but I think that's just me. With the silver trim and the head cannons painted gold or bright
brass, it looks very elegant in a Nazi stormtrooperish sort of way. Did that make any sense? Actually, given the fearsome name, the head
of DSH isn't really that scary, but certainly is no-nonsense. The only other feature of note are the
“Hyper Jammers”, which are those snorkel like things on either side of the
head. The obviously don’t work any
better than the rest of the active cloak, or Duo never figured how to use them,
because he’s always getting pasted by anybody who can shoot. The jammers are attached to the backpack,
which has a rather large rocket nozzle stuck out the back. The backpack is hollow on the inside, and
hangs down low enough off the torso you can see into it. This is easy to fix with--you guessed
it--sheet styrene.
Remember I
thought this kit was a lame build, modeling skill wise? Well, I had been toying with the idea of
lighting up the eyes ever since I saw this kit had clear eyes. To see how I dealt with it and the results,
go here.
For the money, this is a great kit. I’m not the world’s biggest “California Dude
Duo” fan (in the Japanese version he is actually not that annoying), and still
can’t make up my mind whether this design is super or silly. HOWEVER, if you like the design, this kit is
outstanding for an HG. The kit is
strong enough to compensate for the main detractors, leg poseability and the
ugly bat wing box. Even if you don’t like the design that much, it is still the
simplest kit in the line, and builds up to an attractive model to round out you
Gundam Wing collection.
Ratings
(for unmodified kit):
Value: 10
Ease
of build: 10
Execution
of overall design: 9
Detail: HG
Gimmick
execution: 5
Weapons: 9
My DeathScythe Gallery
Front w/Scythe 1 Front w/Scythe 2 Front w/Scythe Wings Closed Face Close-up Front, Buster
Shield Front, Wings Spread, Eyes Lit Wings open, Eyes lit 2 Rear