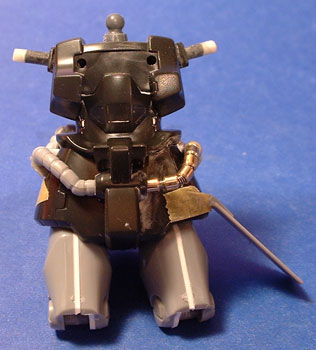
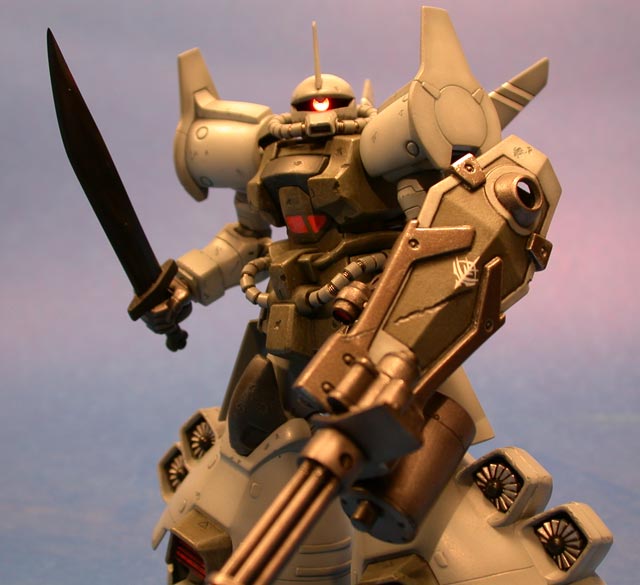
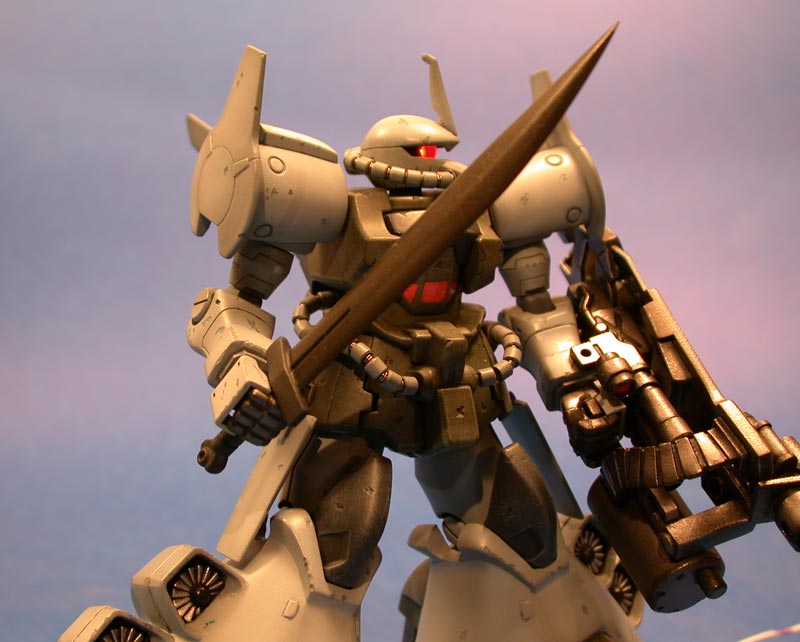
1/144 Gouf Flight Type
Out of the box, this is an excellent kit. It is easily as good as the best 1/144 kits,
excluding some of the better HGUC kits.
There are only two exposed polycaps, the elbows and the knees. In details, it is a good representation of
the bulky, clunky flight type, and comes with the full weapons load out. One neat trick in particular is that it has
2 shields: one with the large Gattling cannon mounted on it, and 1
"clean" shield. It also comes
with the finger cannon the original Mobile Suit Gundam Gouf had.
Of course, there is always room for
improvement. My plan for this kit:
- Replace Shield Gattling cannon barrels with brass
tubes, resin & lead foil details; replace wrist cannon barrels and add
PV shield mount
- A spare resin ammo drum for the Gattling cannon
- Cut & hinge the kit hip skirt so the legs will have
increased mobility
- Replace all power conduits with aftermarket springs and
brass pipe segments
- Cut off bottom of feet and replace details with
aftermarket rocket nozzles & scratchbuilt details
- Add shoulder ball joint at the chest
- Encapsulate knee and elbow PV caps in resin or styrene
so they can be painted and detailed
- Add a rotation joint to the upper arm between the
"bicep" and shoulder block
- Widen thighs with 0.30" styrene
- Replace kit PV ammo belt with resin copy. PV belt has mold lines & defects
that can't be easily corrected.
- Add a light up LED monoeye that can be rotated.
- Replace kit backpack rocket nozzles with aftermarket
parts.
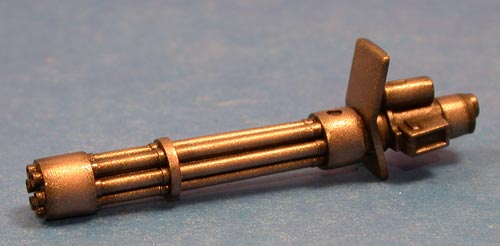
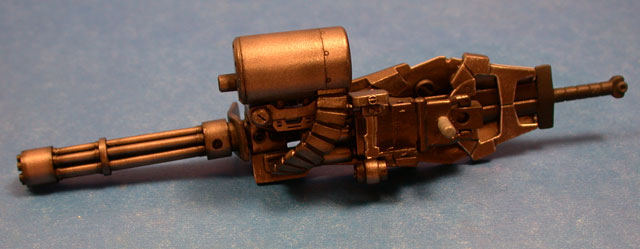
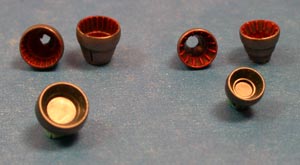
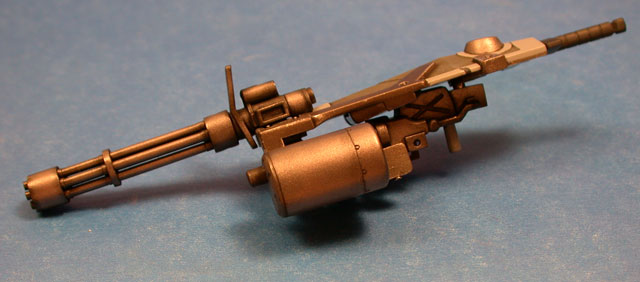
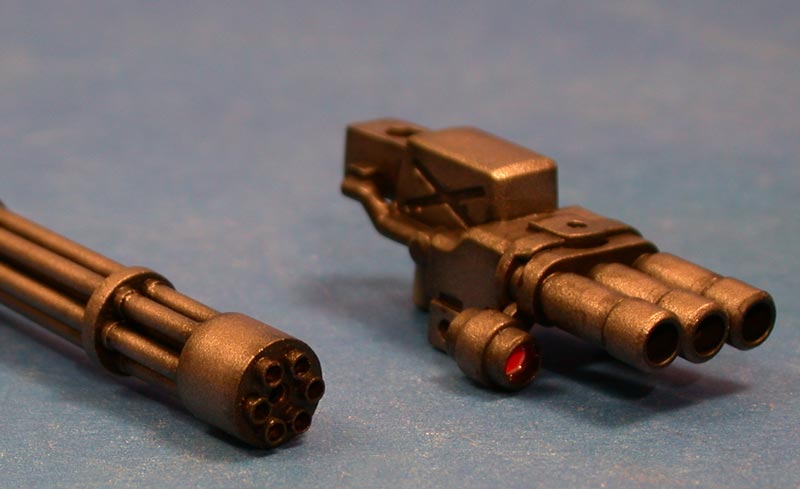
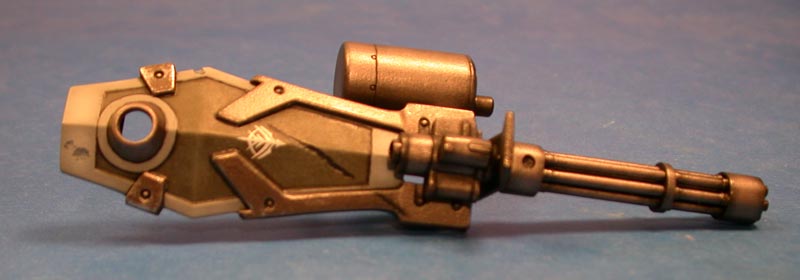
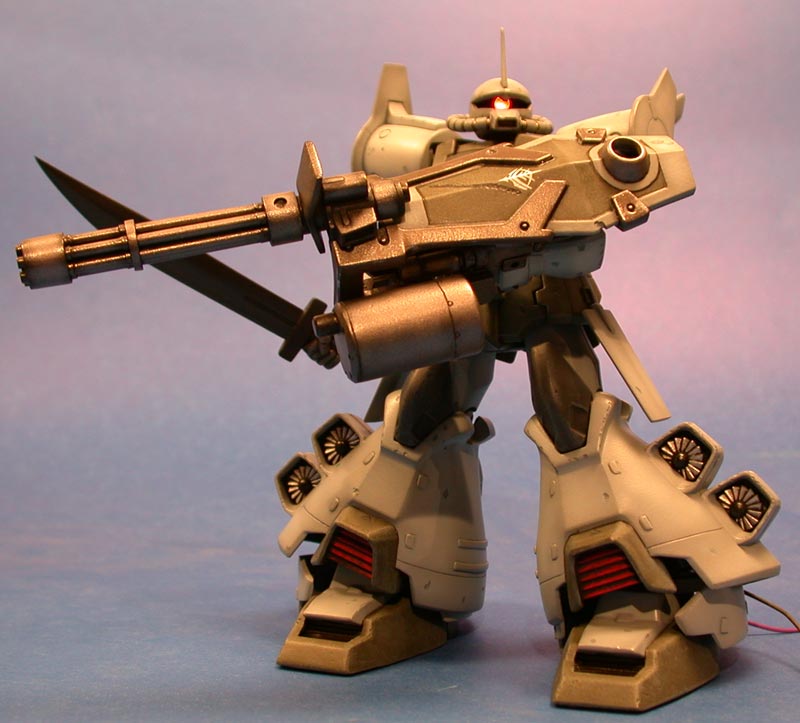
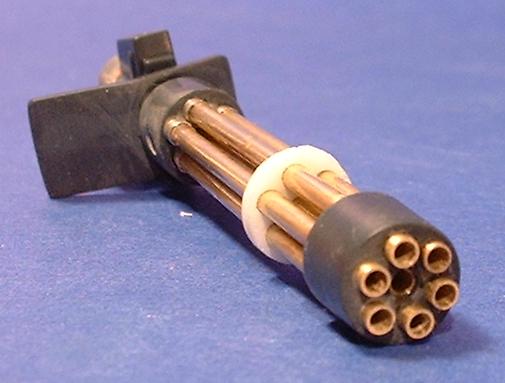 Gattling
Cannon: The Gattling cannon
mod was somewhat simple. The kit end
cap was used to make a new mid-barrel disk, as the kit one was oval. Lead foil from a wine bottle was used to
make the retainer rings at the receiver end.
The retainer rings behind the muzzle and ahead of the barrel disk were
made from thin copper sheet, cut into strips and superglued on—AFTER the
barrels were already in place on the receiver!
There really weren’t too many easy options for that part considering the
cannon layout.
Gattling
Cannon: The Gattling cannon
mod was somewhat simple. The kit end
cap was used to make a new mid-barrel disk, as the kit one was oval. Lead foil from a wine bottle was used to
make the retainer rings at the receiver end.
The retainer rings behind the muzzle and ahead of the barrel disk were
made from thin copper sheet, cut into strips and superglued on—AFTER the
barrels were already in place on the receiver!
There really weren’t too many easy options for that part considering the
cannon layout.
The spare ammo drum was a very simple
RTV/resin casting.
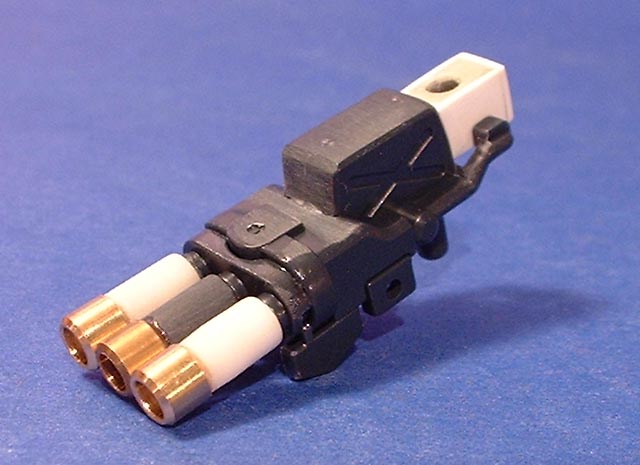
The Wrist cannon come with a
plastic-to-plastic joint for the Gattling shield. Since the Gattling shield is so heavy, I wanted a PV joint there
so the joint wouldn’t wear out. I built
a sheet styrene box and used SGT to anchor a PV
cylinder for the shield mount. I
replaced the kit barrels with resin barrels and brass pipe muzzles.
Hip Skirt and Power Conduits:
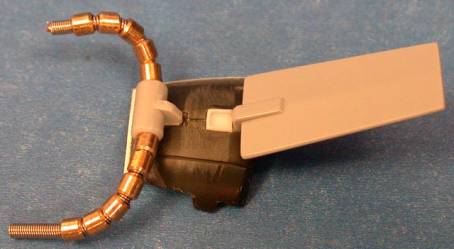 I
cut the skirt piece off by tracing along the panel lines with the back edge of
an X-Acto blade, applying gentle pressure with each pass. Hinging the hip skirt was made easy with the
waist power conduit replacement--the conduit is the hinge axis. The conduit has 3 parts: a solid wire core
for shaping, a Wave Option part A Spring and Max Factory Small brass pipes,
both from
I
cut the skirt piece off by tracing along the panel lines with the back edge of
an X-Acto blade, applying gentle pressure with each pass. Hinging the hip skirt was made easy with the
waist power conduit replacement--the conduit is the hinge axis. The conduit has 3 parts: a solid wire core
for shaping, a Wave Option part A Spring and Max Factory Small brass pipes,
both from ![]() . The stiff wire core is essential, since the
waist conduit has several sharp turns a spring with pipe sections wouldn't
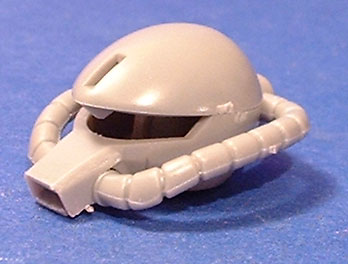
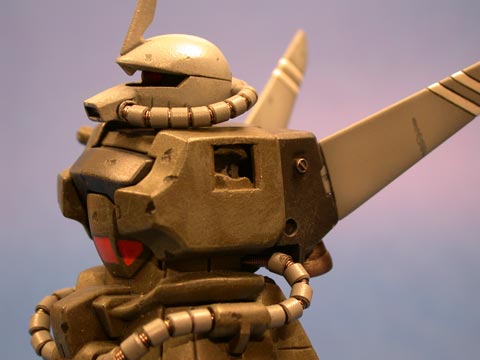
hold. The head power conduits also used
A springs and the SS sized pipe sections.
The old head is shown below—cleaning up the seam lines on the power
conduits was not going to be fun. I
cleaned the pipe sections by soaking them in acetone and then drying them on a
clean paper towel. The pipe sections
were strung on a section of bicycle brake cable and sprayed with the
primer/color coat.
. The stiff wire core is essential, since the
waist conduit has several sharp turns a spring with pipe sections wouldn't
hold. The head power conduits also used
A springs and the SS sized pipe sections.
The old head is shown below—cleaning up the seam lines on the power
conduits was not going to be fun. I
cleaned the pipe sections by soaking them in acetone and then drying them on a
clean paper towel. The pipe sections
were strung on a section of bicycle brake cable and sprayed with the
primer/color coat.
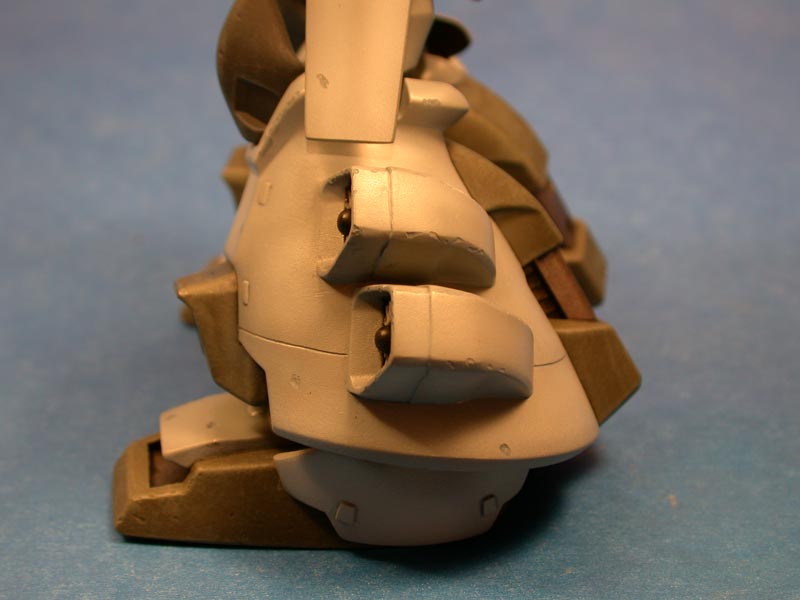
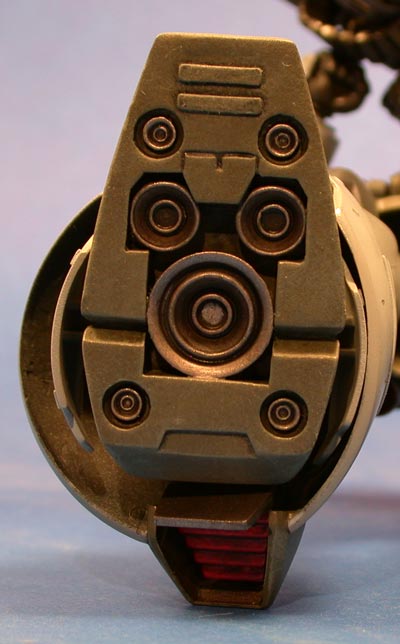
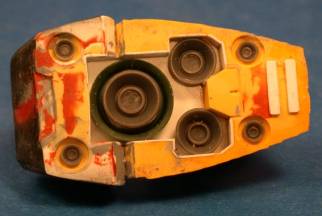 Foot Sole: The foot sole detailing was overall a
fairly simple scratchbuild, though it looked intimidating. The kit sole is nearly flat. It should be 3-D, with an inset holding 3
larger detailed rocket nozzles and 4 small nozzles around the sole
periphery. First, I
Foot Sole: The foot sole detailing was overall a
fairly simple scratchbuild, though it looked intimidating. The kit sole is nearly flat. It should be 3-D, with an inset holding 3
larger detailed rocket nozzles and 4 small nozzles around the sole
periphery. First, I 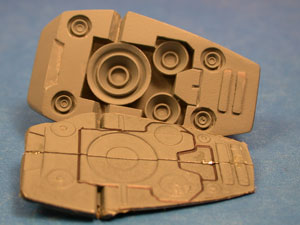 glued
the foot halves together, then photocopied the kit foot. Using the photocopy and the B-Club MG Gouf
Flight Type conversion as a guide, I built the inset. After cutting out the entire bottom of the kit foot and coating
the inside with Vaseline, I mounted the inset into the now hollow foot
bottom. Using Mori Mori polyester putty
and SGT, the sole of the foot was rebuilt around the inset. I used a large drill bit to create shallow
depressions in the Mori Mori putty around the inset to hold the 4 small
nozzles. The inset smaller rocket
nozzles came from some Kotobukiya sets, while the main nozzle was scratchbuilt
from a spare nozzle and a 1/72 scale B-1B main wheel. When the sole was rebuilt, I cut off the entire back of the foot
with a razor saw—I wanted to have a large chunk of resin in the recast for pour
stubs. Cutting of the back of the foot
destroyed half of the PV pivot mount for the ankle guards, which I rebuilt with
SGT. With the completed sole built, I
popped it out of the upper foot shell (that’s why I used the Vaseline) and made
a 2-part mold. By my third casting
attempt, I had 2 beautifully detailed replacement parts to give the kit some
sole!
glued
the foot halves together, then photocopied the kit foot. Using the photocopy and the B-Club MG Gouf
Flight Type conversion as a guide, I built the inset. After cutting out the entire bottom of the kit foot and coating
the inside with Vaseline, I mounted the inset into the now hollow foot
bottom. Using Mori Mori polyester putty
and SGT, the sole of the foot was rebuilt around the inset. I used a large drill bit to create shallow
depressions in the Mori Mori putty around the inset to hold the 4 small
nozzles. The inset smaller rocket
nozzles came from some Kotobukiya sets, while the main nozzle was scratchbuilt
from a spare nozzle and a 1/72 scale B-1B main wheel. When the sole was rebuilt, I cut off the entire back of the foot
with a razor saw—I wanted to have a large chunk of resin in the recast for pour
stubs. Cutting of the back of the foot
destroyed half of the PV pivot mount for the ankle guards, which I rebuilt with
SGT. With the completed sole built, I
popped it out of the upper foot shell (that’s why I used the Vaseline) and made
a 2-part mold. By my third casting
attempt, I had 2 beautifully detailed replacement parts to give the kit some
sole!
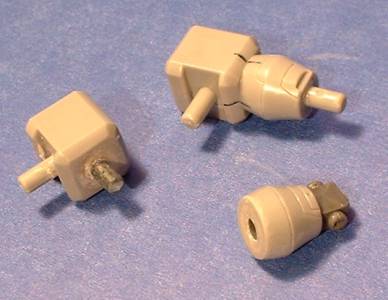
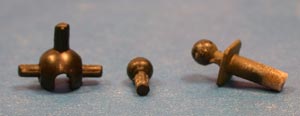 Shoulder/Chest Ball Joint: The kit, like all HG and many HGUC kits,
comes with fixed shoulder pegs sticking out of the torso. Since this was a Zeon design that actually
could use a shoulder socket, I cut out the kit supplied shoulder peg by tracing
along its outline with the back of an X-Acto.
After cleaning up the opening, I used SGT to anchor the
joint socket. The ball and peg part of
the joint was attached to the cut out kit peg with SGT, and then the kit peg
was extended so the shoulder could flex without the arm falling off. This is an extremely simple mod if you have
these joints (available from Kotobukiya or Wave through
Shoulder/Chest Ball Joint: The kit, like all HG and many HGUC kits,
comes with fixed shoulder pegs sticking out of the torso. Since this was a Zeon design that actually
could use a shoulder socket, I cut out the kit supplied shoulder peg by tracing
along its outline with the back of an X-Acto.
After cleaning up the opening, I used SGT to anchor the
joint socket. The ball and peg part of
the joint was attached to the cut out kit peg with SGT, and then the kit peg
was extended so the shoulder could flex without the arm falling off. This is an extremely simple mod if you have
these joints (available from Kotobukiya or Wave through ![]() ). You really have to evaluate each kit,
though, to see if this is worth it. The
DOM, for example, would probably not get anything from it. The Zaku, though, would.
). You really have to evaluate each kit,
though, to see if this is worth it. The
DOM, for example, would probably not get anything from it. The Zaku, though, would.
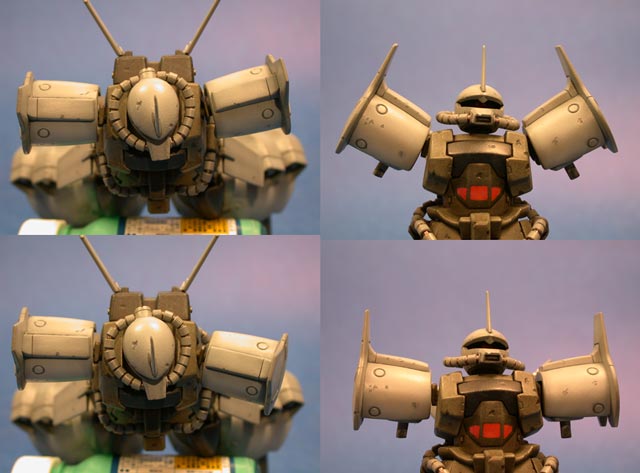
Here is a montage of what that simple mod did for the kit:
Knee and Elbow PV Covers: Follow this link to a page detailing the process… Around the knee joints I did a lot of work to fill in empty spaces or to cover up holes. The backside of the black kneecap pieces and the inside of the lower leg knee areas in particular are hollow, and require some work to fill in.
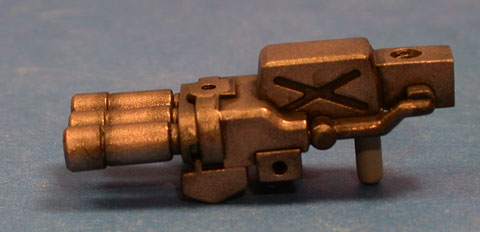
 Bicep Rotation Joint: The bicep rotation joint was needed
because the elbow PV is now one fused piece in a resin shell. The only real problem with this mod was that
the arm bicep cylinder was not round.
It actually ended up being a little flat along the seam line edge, which
made rotation tricky—if the arm rotates too much, the bicep will appear off
center. To make the pin and axis line
up as good as possible, I pre-marked the joint to be cut on all four sides. When the cut was made, I connected the marks
across the cut surfaces, creating an “X marks the spot” where to drill. It was easier to have the pin side go into
the shoulder and the hole into the bicep.
SGT was used to bond the pin in place, since it would undergo a lot of
stress, and to lock the receiver PV in the bicep.
Bicep Rotation Joint: The bicep rotation joint was needed
because the elbow PV is now one fused piece in a resin shell. The only real problem with this mod was that
the arm bicep cylinder was not round.
It actually ended up being a little flat along the seam line edge, which
made rotation tricky—if the arm rotates too much, the bicep will appear off
center. To make the pin and axis line
up as good as possible, I pre-marked the joint to be cut on all four sides. When the cut was made, I connected the marks
across the cut surfaces, creating an “X marks the spot” where to drill. It was easier to have the pin side go into
the shoulder and the hole into the bicep.
SGT was used to bond the pin in place, since it would undergo a lot of
stress, and to lock the receiver PV in the bicep.
The original kit wrist, seen here, was not exactly pretty.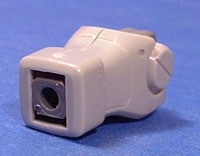 Since the hands don’t have a lot of flex at
the wrist, I made a wrist joint cover from poly putty carved and sanded to
shape.
Since the hands don’t have a lot of flex at
the wrist, I made a wrist joint cover from poly putty carved and sanded to
shape.
 Widen Kit Thighs: Who
doesn’t love big thighs? Widening the
kit thighs was fairly simple—glue the snap receiver side of the thigh to a
sheet of 0.30” styrene. I trimmed the excess away from the mating edge, and it
was done. In this picture, you can also
see how the brass pipes improve the power conduits, and the SGT extensions on
the shoulder pegs.
Widen Kit Thighs: Who
doesn’t love big thighs? Widening the
kit thighs was fairly simple—glue the snap receiver side of the thigh to a
sheet of 0.30” styrene. I trimmed the excess away from the mating edge, and it
was done. In this picture, you can also
see how the brass pipes improve the power conduits, and the SGT extensions on
the shoulder pegs.
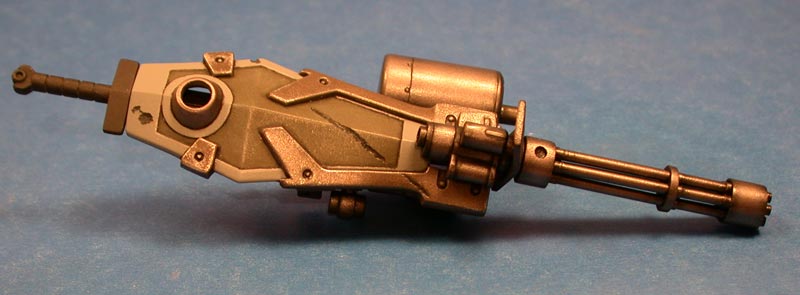
 Resin Ammo Belt Replacement: The kit ammo belt for the big shield
Gattling cannon is made for polyvinyl—the same soft garbage the PV joints are
made from. This stuff is nearly
impossible to clean up, as it shreds instead of sands. Since it is very smooth and flexible, paint
usually will not stick to it. I made a
quick RTV mold and cast a resin copy, which was very workable. Along with the resin ammo belt, I spruced up
the interior of the
Resin Ammo Belt Replacement: The kit ammo belt for the big shield
Gattling cannon is made for polyvinyl—the same soft garbage the PV joints are
made from. This stuff is nearly
impossible to clean up, as it shreds instead of sands. Since it is very smooth and flexible, paint
usually will not stick to it. I made a
quick RTV mold and cast a resin copy, which was very workable. Along with the resin ammo belt, I spruced up
the interior of the 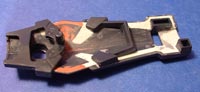 9shield
by filling in the huge voids on the back and by adding Kotobukiya option parts,
like minus molds, rings, etc.
9shield
by filling in the huge voids on the back and by adding Kotobukiya option parts,
like minus molds, rings, etc.
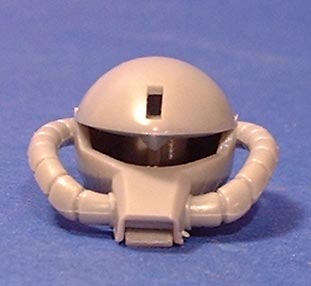 LED Mono Eye (Die Sticker,
DIE!!): The interior of the head
is a cylinder section (visible in the picture) you can plop a sticker on. STICKER??!!
LED Mono Eye (Die Sticker,
DIE!!): The interior of the head
is a cylinder section (visible in the picture) you can plop a sticker on. STICKER??!!
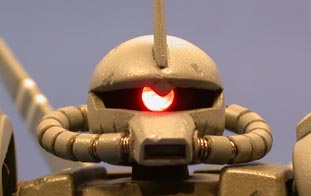 Yeah,
right. I drilled out an LED sized hole
in the cylinder and mounted a small LED, running the leads down the neck. On the torso, I ditched the PV neck and made
a new neck receiver from a block of SGT. Since the head sits very low on the
neck, the neck receiver just has to hold the head in place. The remainder of the wiring was run through
the torso and into the left leg as I made the final kit assembly. The trickiest part about this is the LED
leads. You basically have to bend them
flat against the back of the LED since the space is so tight. The images show the LED a little brighter
than it really is, but either way it looks a heck of a lot better than a
STICKER!!
Yeah,
right. I drilled out an LED sized hole
in the cylinder and mounted a small LED, running the leads down the neck. On the torso, I ditched the PV neck and made
a new neck receiver from a block of SGT. Since the head sits very low on the
neck, the neck receiver just has to hold the head in place. The remainder of the wiring was run through
the torso and into the left leg as I made the final kit assembly. The trickiest part about this is the LED
leads. You basically have to bend them
flat against the back of the LED since the space is so tight. The images show the LED a little brighter
than it really is, but either way it looks a heck of a lot better than a
STICKER!!
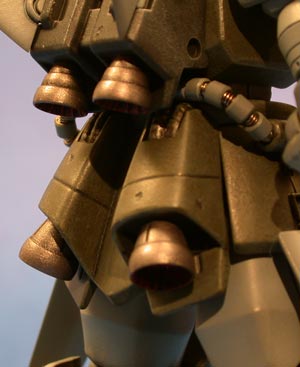
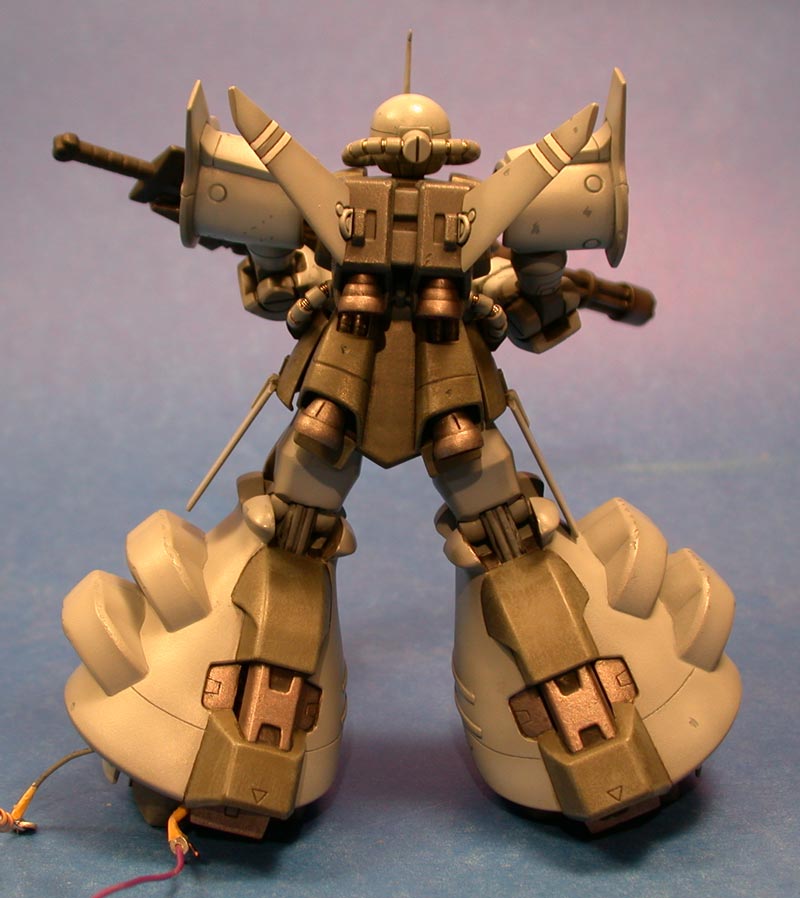
Backpack Rocket Nozzles: The kit backpack nozzles are pretty pathetic—they are just shallow disks that do not look like much more than dinner plates. They don’t exactly imply massive thrust and lifting power. These were replaced with Kotobukiya nozzles that look like they actually could do something. On the backpack itself, there are some draft angle problems on the sides. I fixed this by using a drill to turn a shallow depression into a circular hole and by using aftermarket minus molds to replace other detail.
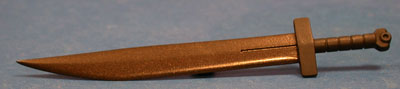
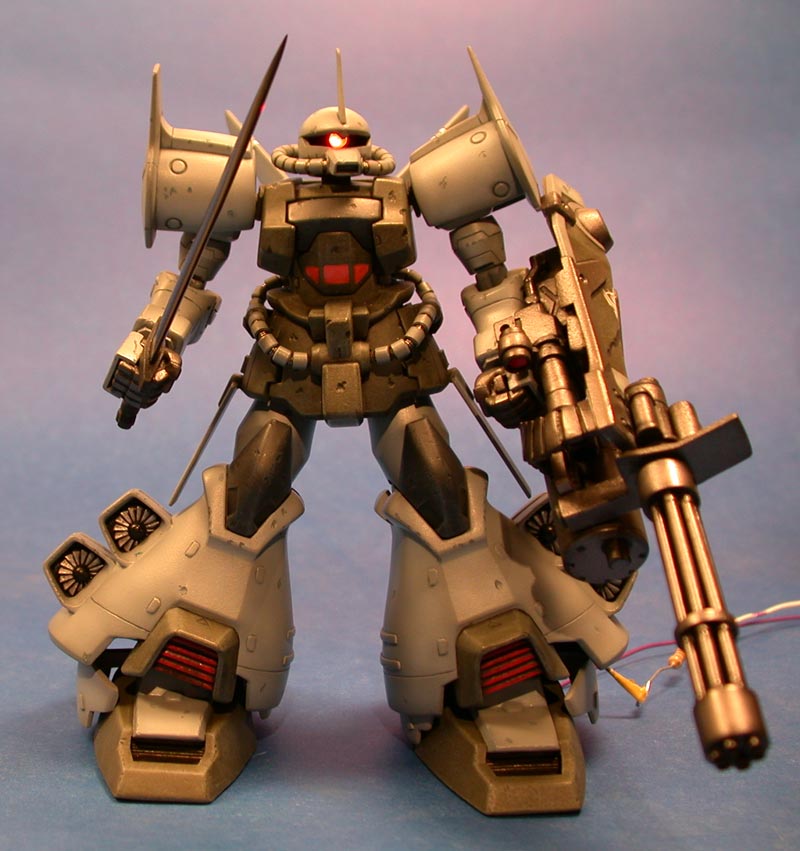
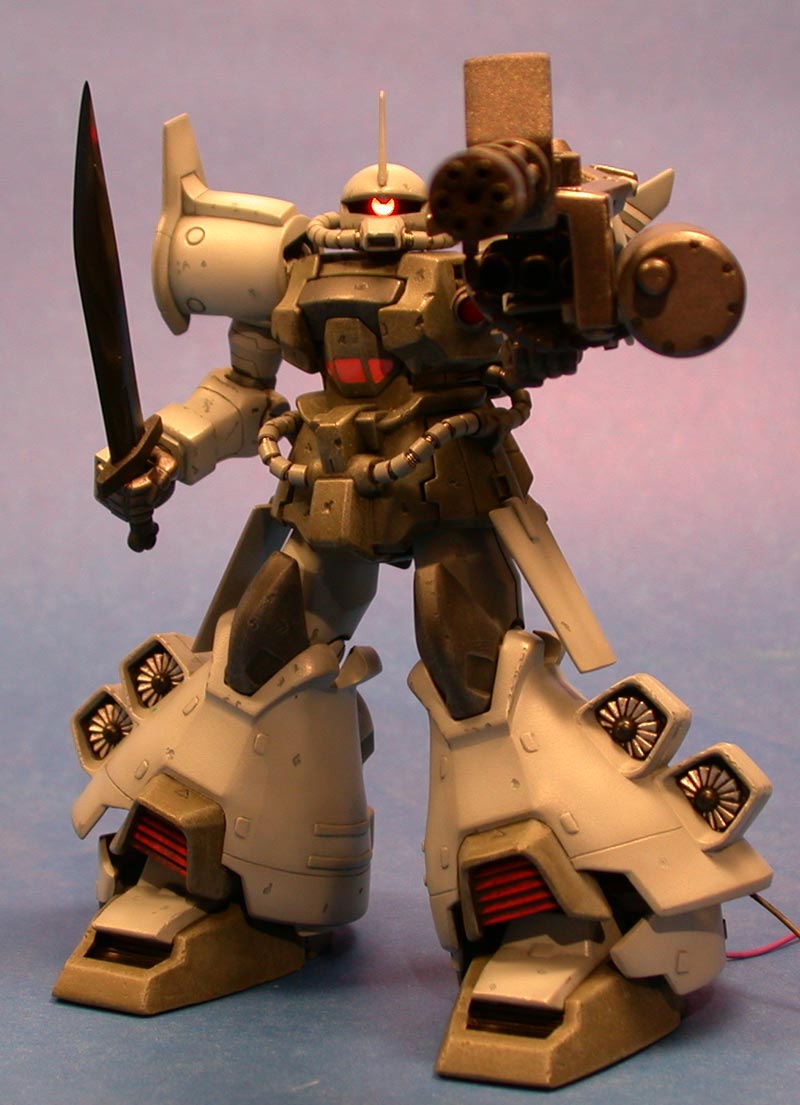
Painting and Finishing: Most of the seam work was done with SGT—I didn’t want any filler shrinking over time or because of the primer. Especially on the leg seams, going over the jet engines, SGT made the filling and resculpting as straightforward as that sort of mess could get. After priming with Krylon No. 1318 sandable primer, I went on to the color coats. This guy is on screen for all of about 25 seconds in the 08th MST, so color matching is a trick—especially since you NEVER see the back of the mecha. My primary painting guide was using the 08th Hobby Japan Weapons book article on the MG Gouf Flight Type conversion kit. To my eye, the dark portions are a green or a brown. I went with green, using Krylon Camouflage Paint System Olive Drab (OD) on the torso, leg trim and shield. This was dry-brushed with Model Master RAF Dark Slate Grey, which out of the bottle is perfect for drybrushing the OD paint. The black parts (knee caps, backpack and chest plate were painted in Model Master Aircraft Int. Black, and drybrushed with GunShip Gray. The lighter gray parts were painted with a darker mix of Mr. Color #13 Neutral Gray and #156 Super White IV for pre-shading, and then highlighted with a lighter mix of the same. One thing I wanted to avoid was heavy-handed pre-shading. As a 1/144 kit, it is supposed to be a big thing. Big things tend to have washed out colors, so really strong preshading or tight demarcations wouldn’t look realistic. The red thruster liners were painted with Mr. Color #68, Red Madder (madder than what?). Finally, the metal parts, like the cannons, the sword, the back of the legs, etc. was painted with Mr. Color #28 Steel (which is a very dark metallic). The highlighting metallic shade was #61 Burnt Iron, which is also a great thruster color. For a little wear and tear, I drybrushed the high points with Model Master non-buffing steel metalizer. The cockpit windows were orange mixed from Mr. Color Red and Yellow, with some interference red Pearl powder mixed in. Finally, the fan blades on the leg turbines were painted with Mr. Color aluminum, and washed heavily with the black wash.
For further weathering, I applied a black wash to the OD
parts and a lighter gray wash to the gray parts. A black wash on something that is supposed to be huge just has
too much contrast and looks cartoonish; thy gray wash blends well and is subtle
yet noticeable. The wash was Winsor
& Newton acrylics, thinned with ethyl alcohol. This wash is extremely fine, and is not grainy at all. The downside is the ethyl alcohol can remove
Mr. Color. Yep, lacquer is a tough
paint, but rubbing alcohol can attack it.
I was very careful when cleaning up the wash to not go crazy and tear
the color coat off. One really great
thing about this wash is it is permanent—you do not need to seal the kit to
keep the wash from rubbing off.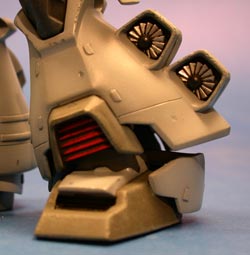
The final weathering was applied with a Dremel tool and a small round bit. I have never tried simulating battle damage on a mech before, so hopefully it looks OK. The way I see it, this mech is defending the last Zeon Mountain base on Earth, and they are getting the snot pounded out of them. I can't see how this guy would escape any damage and looks squeaky clean on its final flight. I did go overboard on certain parts; for example on the feet and the feet guards, I totally overdid the pockmarks. It just didn't make sense that a part of the machine so well protected as the feet and the feet guards would have so much damage. I ended up going back and completely repairing the damage, repainting and weathering the parts, and then going back with the Dremel tool more lightly. Fortunately, the dry brushing and pre-shading help hide the previous repair work. For the various pockmarks, I used the black or the gray wash to fill in and weather the damage.
Remember the stickers? The kit comes with more than just a mono eye sticker—it includes a small dry transfer for the chest Zeon crest. I realized after going crazy with the Dremel tool, I had put a blast mark right smack dab in the middle of where the yellow Zeon crest was supposed to go. Fortunately, I didn't want to put a Zeon crest their anyways. Instead I wanted to put one on the shield, similar to how the MG version of this kit is marked. For the Zeon crest on the shield, I used one of my Zeon decals. This is literally the first time I had used one, and I was very interested to see how they would work out. I prepped the shield by applying a few coats of Future over the flat Olive drab paint so the detail would have a smooth surface to adhere to. After I applied the decal, I sprayed the area with Dullcoat to seal the decal. The results are awesome!
Roundup: This is a great kit. In spite of all the modifications I made,
you can still make a fantastic model with this guy straight out of box. My main motivation for these modifications
was to try out the techniques. When you
look at what the kit comes with, including the extra cannon hand and an extra
shield if you do not want to have the shield mounted Gattling cannon displayed,
it really is an amazing kit for 1000 Yen.
As far as I am concerned, the 08th Mobile Suit Team HG kits
are the best of the HG series. I
seriously swore I would never build a 1/144 scale kit--before I found this particular
series of kits. Along with the RGM-79(G)
Sniper, this
kit is another winner.
Gallery
Wrist Cannon Sword Gattling
Shield Side Cannon
Shading Complete
Gattling Shield Back
Detail
Leg
Back Leg
Side Front 1 Front
Right Left Side Front Left Finished
Shield Foot Detail Back
The last thing
you’ll ever see… The last thing
you’ll ever see, part 2… That’s my
parking spot…
If you found this page useful, e-mail me
with you comments!