TallGeese I/II/III Review
Others, notably Probe, have reviewed this kit.
I am going to limit myself to just the modifications I made to the kit
and the modeling challenges this excellent kit provides.
But first, time for the soapbox. Why is TallGeese so popular? I think there are several reasons. First, it is the least fantastic of the
major GW Mecha. TallGeese just has
appealing, no-nonsense lines. It has no
gimmicks like any of the 7 Gundams, and is as functional and graceful as a
sabre. Second, it is a one-off; the
Über Leo. Though there are eventually 3
built, there is never more than one at a time.
You get the impression it is as tied to its pilot as any of the major
Gundams. Finally, and most importantly
to me, it is NOT invincible. Unlike the
Gundam pilots, Zechs or Treize are dependent only on their speed and skill to
survive. TallGeese is the perfect MS
for these two, and though an "old" design, complements these 2 great
pilots with its own blistering speed & agility.
Overall: This kit is the
ultimate evolution of the Gundam Wing HG 1/100 series. The original series of GW kits are
essentially clones. Aside from any kit
specific gimmicks, they all build up identically. TallGeese is part of the GW: Endless Waltz series of kits, and
sports similar but different engineering.
 Modifications: To me, there is only one TallGeese worth
modeling (assuming you only have one kit):
TallGeese I. My main references
for all mods are the screenshots you can find at: http://pictures.gundamw.net/ep12pics.html or http://www.epy0n.com/winggallery.htm,
the second having substantially more shots than the first. One goal I had for TallGeese was good leg
flexibility. I was ultimately trying to
get it into a kneeling pose. Remember
Zechs seeing a kneeling TallGeese I in the back of the transport aircraft? The first mod was to enlarge the thigh ball
socket opening. By removing a small
amount of plastic from the top and rear of the hole, side leg splay can be
greatly improved.
Modifications: To me, there is only one TallGeese worth
modeling (assuming you only have one kit):
TallGeese I. My main references
for all mods are the screenshots you can find at: http://pictures.gundamw.net/ep12pics.html or http://www.epy0n.com/winggallery.htm,
the second having substantially more shots than the first. One goal I had for TallGeese was good leg
flexibility. I was ultimately trying to
get it into a kneeling pose. Remember
Zechs seeing a kneeling TallGeese I in the back of the transport aircraft? The first mod was to enlarge the thigh ball
socket opening. By removing a small
amount of plastic from the top and rear of the hole, side leg splay can be
greatly improved.
At
first blush, kneeling looks simple enough.
TallGeese doesn't have a large front armor skirt to impede motion. On closer inspection, the picture isn't as
rosy. The thigh is substantially
shorter than the lower leg/foot, so the forward bent knee has to go
substantially beyond 90°. The rearward
leg has to fit under the rear armor skirt, which comes as a fused chunk of
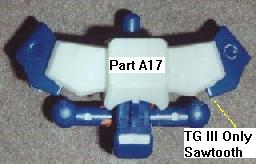
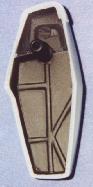
plastic. Now comes the first real
problem: if you look at the hips from
the front, there is a saw tooth along the front edge (see picture). This pokes down and is in the way of the
thigh when you try to move the leg forward, which limits the thigh
forward travel (less than 20° when over 90° is needed). Even with the small, fixed front armor
skirt, ol' thunder thighs has problems.
 Solutions? Move the leg mounting peg back/down, thin
the leg front to back or modify what little front armor skirt there is to
move. Moving the leg pegs would throw
off the kit lines, and cutting down the leg would buy little for a lot of
work. Fortunately, if you are building
TG I or TG II, the problem is partially solved! The kit supplied waist and front armor plate are accurate for the
TG III, which never really gets to a kneeling pose. However, TG I does not have that saw tooth—it is flat across the
bottom. By slicing off the saw tooth,
the proper TG I waist can be done with a great improvement to the leg
mobility. This one cut nearly doubles
the forward swing of the thigh. But, it
still isn’t enough. O’l thunder thighs
forward leg swing is still limited by the waist and the outside of the hips.
Solutions? Move the leg mounting peg back/down, thin
the leg front to back or modify what little front armor skirt there is to
move. Moving the leg pegs would throw
off the kit lines, and cutting down the leg would buy little for a lot of
work. Fortunately, if you are building
TG I or TG II, the problem is partially solved! The kit supplied waist and front armor plate are accurate for the
TG III, which never really gets to a kneeling pose. However, TG I does not have that saw tooth—it is flat across the
bottom. By slicing off the saw tooth,
the proper TG I waist can be done with a great improvement to the leg
mobility. This one cut nearly doubles
the forward swing of the thigh. But, it
still isn’t enough. O’l thunder thighs
forward leg swing is still limited by the waist and the outside of the hips.
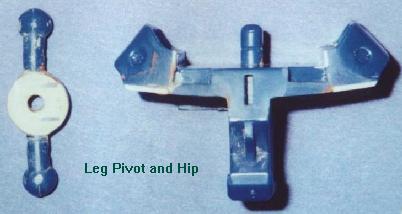
You
can also see in the screenshot (courtesy ![]() )
that the sides of the hips are substantially higher than what the kit
provides. In the kit-supplied part, the
hips mount to essentially a flat plate, like TG III has. The picture to the left shows the outsides
of the hips are jacked up a bit above the rest of the hip/groin piece.
)
that the sides of the hips are substantially higher than what the kit
provides. In the kit-supplied part, the
hips mount to essentially a flat plate, like TG III has. The picture to the left shows the outsides
of the hips are jacked up a bit above the rest of the hip/groin piece. 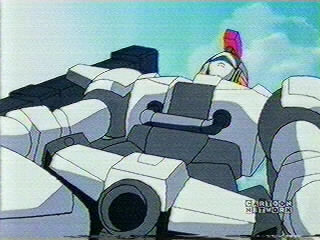 The image to the right more clearly shows the lowest piece in
the front is the white armor plate. At
some point, you gotta realize the miracle mobility shown in the anime does not
always occur in real life, and is purely anime magic. So, to make this work, some more extensive surgery is
involved. My plan was to put a simple
pivot in the leg mounting pegs, so as one leg goes down, the other will go up.
The image to the right more clearly shows the lowest piece in
the front is the white armor plate. At
some point, you gotta realize the miracle mobility shown in the anime does not
always occur in real life, and is purely anime magic. So, to make this work, some more extensive surgery is
involved. My plan was to put a simple
pivot in the leg mounting pegs, so as one leg goes down, the other will go up.
The
following mods would take me about an hour (except Milliput curing time) to
make now, since  the mechanics aren’t that hairy. The only tools and supplies needed (beyond standard X-Acto knives
and sandpaper stuff) are a razor saw, any epoxy putty, a spare “D” polycap
(like the one used to hold the TallGeese head on), a drill and 1/8” drill bit,
and a 1/8” metal rod or tube. First, I
sliced off the outer hips with a razor saw.
This leaves you with the two hips and the leg mount part, which
the mechanics aren’t that hairy. The only tools and supplies needed (beyond standard X-Acto knives
and sandpaper stuff) are a razor saw, any epoxy putty, a spare “D” polycap
(like the one used to hold the TallGeese head on), a drill and 1/8” drill bit,
and a 1/8” metal rod or tube. First, I
sliced off the outer hips with a razor saw.
This leaves you with the two hips and the leg mount part, which 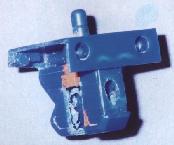 from the top looks like a 1” x 1” square. Next, the leg pegs need to come out. I cut those out straight from the bottom of
the groin area with the razor saw, and then cleaned up the cut with a sanding
stick. Next, from the backside of the
groin, drill a horizontal hole through the groin. This hole is where the metal pivot shaft will go. After cutting out the leg posts, there
simply isn’t any room to drill through the center for the pivot. Cutting the leg posts apart by removing the
snap
from the top looks like a 1” x 1” square. Next, the leg pegs need to come out. I cut those out straight from the bottom of
the groin area with the razor saw, and then cleaned up the cut with a sanding
stick. Next, from the backside of the
groin, drill a horizontal hole through the groin. This hole is where the metal pivot shaft will go. After cutting out the leg posts, there
simply isn’t any room to drill through the center for the pivot. Cutting the leg posts apart by removing the
snap 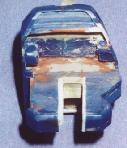 connector between them leaves a space that is perfectly filled
by the D sized polycap. Pre-fitting the
polycap to the pivot shaft is a good idea, since the shaft is bigger than the
cap, and will gouge some material out of the PV. Before you make the PV a permanent part of the kit, make sure the
shaft doesn’t trash it. I used thick
sheet styrene to build a box with the leg posts around the PV cap, and then
locked the PV in place with Milliput.
Milliput was also used to round off the outside of the box, so when the
leg posts pivot the rounded surface will prevent gaps from appearing in the
groin. Any remaining Milliput can be
used to fill in the groin area to strengthen it—all that drilling and cutting
greatly reduces the structural integrity of the part.
connector between them leaves a space that is perfectly filled
by the D sized polycap. Pre-fitting the
polycap to the pivot shaft is a good idea, since the shaft is bigger than the
cap, and will gouge some material out of the PV. Before you make the PV a permanent part of the kit, make sure the
shaft doesn’t trash it. I used thick
sheet styrene to build a box with the leg posts around the PV cap, and then
locked the PV in place with Milliput.
Milliput was also used to round off the outside of the box, so when the
leg posts pivot the rounded surface will prevent gaps from appearing in the
groin. Any remaining Milliput can be
used to fill in the groin area to strengthen it—all that drilling and cutting
greatly reduces the structural integrity of the part.
After finishing
the leg post reconstruction, it is time to put in the pivot post. Stuff the front of the groin where the post
will go, with epoxy glue or putty. A
couple tricks can help make the epoxy bond extra-permanent. First, roughen the metal tube with sandpaper. Next, cut the end of the pivot at 45°. The 45° cut when surrounded by putty or
glue will make it impossible for the metal post to ever rotate, even if the
glue or putty looses grip on the metal pivot.
Align the leg post PV cap with the pivot axis, and then insert the
pivot. Stuff the backside of the groin
with more putty or glue, then set aside to dry. At this point all you should have left to do is reconstruct the
cut out region below the leg posts, which can be done with styrene or epoxy putty. One final mod that helps is to trim the
mounting peg for part A17, the white armor plate on the front of the hips. Since A17 mounts into slot, when you cut off
the top 2-3 mm of the mounting peg you can slide the plate upwards giving you a
few more degrees of forward leg swing.

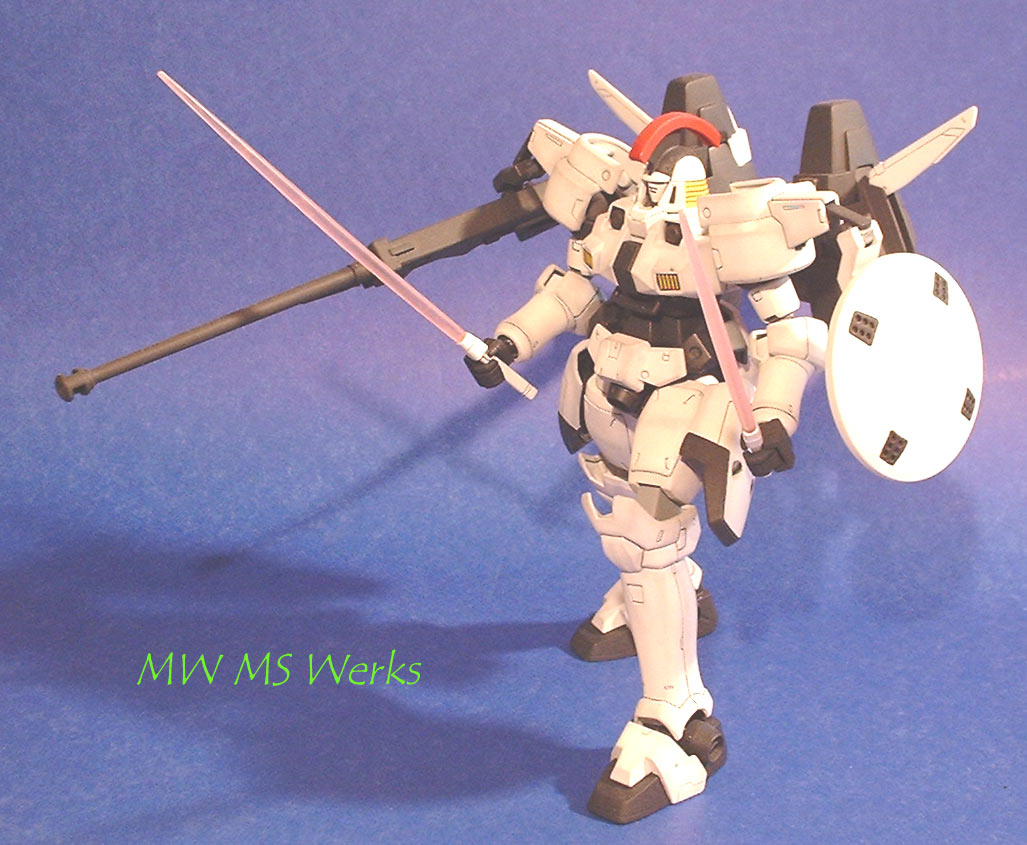
So, What did all this surgery by me? Can the TG I now kneel like in the anime? Well, uhm, like I said earlier, some of the
TG flexibility is pure anime magic. I
can get the forward thigh above horizontal by a few degrees, as seen here,
which is a huge improvement over the stock kit. Since the lower leg is so much longer than the thigh, a true
kneel is not reasonable—the rearward leg thigh is too damn short to reach the
ground. Certainly the poses seen in the
anime are not physically possible with this kit—the thigh would have to rotate
through the kit waist to get the rear knee on the ground. BUT (and everyone has one;) the poses
TG can now be put into are a heck of a lot more dynamic than the original.
 Other mods: Splitting the rear skirt armor is a simple mod that looks more
dynamic, and marginally aids in posing when kneeling. A razor saw or X-Acto knife is good for this. A little repair work is needed to clean up
the join area. My main reason for the
split was to add a framework to the inside of the rear skirt armor. A sheet of styrene was fitted to the
interior of the armor to wall it off.
Thin strips of styrene were then applied with Tenax to create the
framework. After cleanup, the framed
wall was glued in place. When painted a
dark color like Gunship Grey for standard GW kits or Aircraft Black for TG,
this effect is stunning.
Other mods: Splitting the rear skirt armor is a simple mod that looks more
dynamic, and marginally aids in posing when kneeling. A razor saw or X-Acto knife is good for this. A little repair work is needed to clean up
the join area. My main reason for the
split was to add a framework to the inside of the rear skirt armor. A sheet of styrene was fitted to the
interior of the armor to wall it off.
Thin strips of styrene were then applied with Tenax to create the
framework. After cleanup, the framed
wall was glued in place. When painted a
dark color like Gunship Grey for standard GW kits or Aircraft Black for TG,
this effect is stunning.
 You can do the
same for the hip armor plates, but the black interior is hard to see on the
kit--you decide. The rear skirt armor
is the first time I partially walled off the interior before making the
framework. These pieces are very deep
and convoluted, so just gluing styrene strips on the interior isn't worth the
trouble. Walling off the interior gives
a good surface for the framework and adds heft. With broad, flat pieces like the DSH rear skirt armor, walling it off isn't necessary. Either way this technique gives a nice look
without shelling out shekels for a B-Club conversion (all you get for TG I from
the B-Club set at 6800 Yen is the hip and rear waist armors with interiors, and
joint covers).
You can do the
same for the hip armor plates, but the black interior is hard to see on the
kit--you decide. The rear skirt armor
is the first time I partially walled off the interior before making the
framework. These pieces are very deep
and convoluted, so just gluing styrene strips on the interior isn't worth the
trouble. Walling off the interior gives
a good surface for the framework and adds heft. With broad, flat pieces like the DSH rear skirt armor, walling it off isn't necessary. Either way this technique gives a nice look
without shelling out shekels for a B-Club conversion (all you get for TG I from
the B-Club set at 6800 Yen is the hip and rear waist armors with interiors, and
joint covers).
Also to aid in kneel appeal, I took a Dremel tool to the
snap-together pins at the top inside of the knee. If the knee is heavily bent forward and you are able to look
behind the knee guard, the male-female snap connector looks really bad. Using a round bit on low speed, it is easy
to remove fairly cleanly. The pin
connector on the Dober Gun clip retainer received the same treatment. Another use for the Dremel tool was
modifying the Dober Gun clip to add a more realistic looking top shell. The old molded in shell was ground out, and
a new shell made from brass tubing and Milliput was put in.
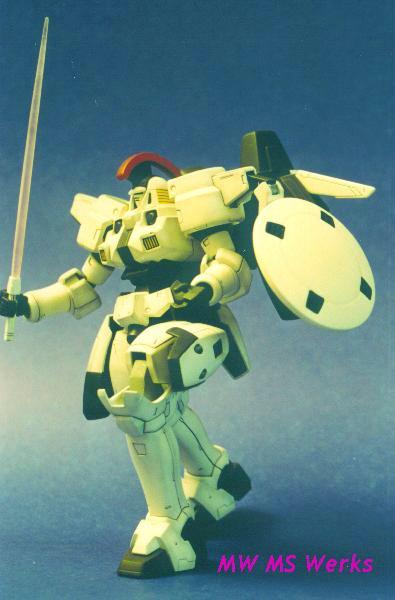
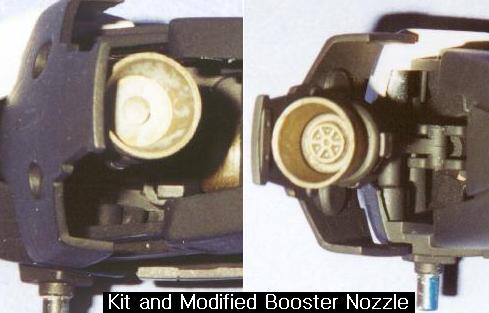 The shoulder mounted
booster pod rocket nozzles look quite nice from the side when fully opened (and
is there really any other way to display a TG than with the boosters open and
blasting full bore?!). Unfortunately,
like most HG GW kits, the rocket nozzles have a mounting hole that goes
completely through the nozzle; when viewed from the rear, the plain interior of
the nozzle is worsened by the highly obvious mounting peg! Adding insult to injury, the pegs protrude
differently from each nozzle, so you can’t really pretend they look OK. To kill this last nitnoid, I took four small
aircraft wheels from my spares box, trimmed the wheels down to the spoked hubs,
and filed the hubs down to thin disks.
Gluing the hub disks over the mounting peg holes gives a neat afterburner
appearance that is cheap and greatly improves the appearance on a part of the
kit hardly anyone will see.
The shoulder mounted
booster pod rocket nozzles look quite nice from the side when fully opened (and
is there really any other way to display a TG than with the boosters open and
blasting full bore?!). Unfortunately,
like most HG GW kits, the rocket nozzles have a mounting hole that goes
completely through the nozzle; when viewed from the rear, the plain interior of
the nozzle is worsened by the highly obvious mounting peg! Adding insult to injury, the pegs protrude
differently from each nozzle, so you can’t really pretend they look OK. To kill this last nitnoid, I took four small
aircraft wheels from my spares box, trimmed the wheels down to the spoked hubs,
and filed the hubs down to thin disks.
Gluing the hub disks over the mounting peg holes gives a neat afterburner
appearance that is cheap and greatly improves the appearance on a part of the
kit hardly anyone will see.
 There are a number of draft angle
problems on key parts of this kit. The
worst are on the shoulder mounted rocket
There are a number of draft angle
problems on key parts of this kit. The
worst are on the shoulder mounted rocket 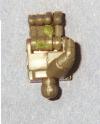 pods near the front.
There are sets of small fins in front of the booster doors that have a
horrible mold line from how Bandai’s 2-part molds work with undercuts. Fortunately, the screen shots from Gundam
Plus do not show that these annoying little fins (just like the ones molded
onto the DeathScythe Hell wing mounting posts) do not exist in the Anime version. Now, I’m not going to argue about the line
art for TG, but for me, on-screen is the way to go. Especially since it cuts the work done and doesn’t detract one
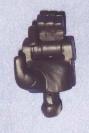
iota from the appearance…. The hands
were also fixed by using Milliput to fill in the interior. 1/100 Wing kits just have the worst hands
when you look at them from the inside; a little work here goes a long way.
pods near the front.
There are sets of small fins in front of the booster doors that have a
horrible mold line from how Bandai’s 2-part molds work with undercuts. Fortunately, the screen shots from Gundam
Plus do not show that these annoying little fins (just like the ones molded
onto the DeathScythe Hell wing mounting posts) do not exist in the Anime version. Now, I’m not going to argue about the line
art for TG, but for me, on-screen is the way to go. Especially since it cuts the work done and doesn’t detract one
iota from the appearance…. The hands
were also fixed by using Milliput to fill in the interior. 1/100 Wing kits just have the worst hands
when you look at them from the inside; a little work here goes a long way.
Painting: For paint, I stuck with
Krylon Flat White in a spray can, and Testors’ Aircraft Black for the black
parts. Aircraft Black is really a very
dark gray, which gives a good scale effect.
The rest of the Goose was painted with standard colors—yellow, olive
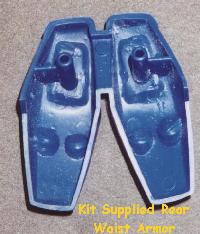
drab, etc. There are a couple details
on painting not obvious from the instructions (the following screen shots are
from http://www.epy0n.com/winggallery.htm). The rear hip armor skirts are totally white
on the outside (all hip & thigh armor plates are black on the inside). The circular inserts are black on both the
hip and rear skirt armor, and the rectangular depression can use a black wash. 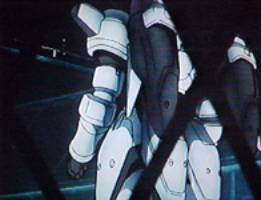 The booster pods are also not completely black.
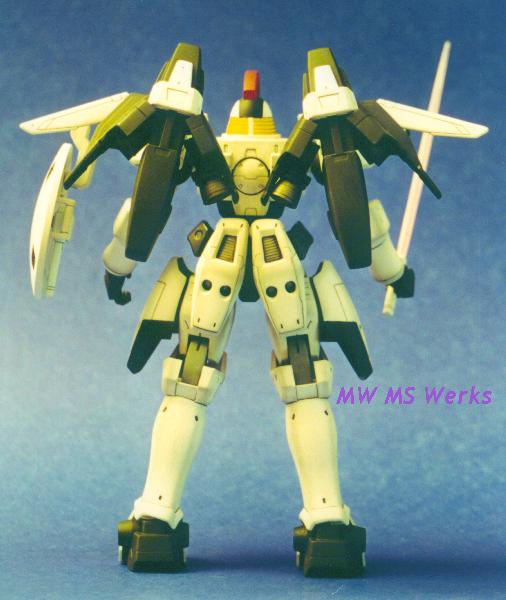
  Viewed from behind, there is a white band directly above the
booster doors. The best references I
have are episodes 10-13, where Zechs is mastering the TG. For shading effects, I went with a slight
gray tint as opposed to a blue tint.
With the overall white/black scheme of the TG I, blue tinted shading
didn’t make much sense.
Viewed from behind, there is a white band directly above the
booster doors. The best references I
have are episodes 10-13, where Zechs is mastering the TG. For shading effects, I went with a slight
gray tint as opposed to a blue tint.
With the overall white/black scheme of the TG I, blue tinted shading
didn’t make much sense.
One outright error in the painting
instructions for the TG I is the shield.
First, the TG I does not and never had the huge golden eagle crest on
its shield. Yes, it looks cool, but is
anime inaccurate. I filled in the eagle
panel lines on the shield with putty to give a smooth finish. Second, there is no black ring around the
outside of the shield. The only black
on the front of the shield are the four rectangular sections around the rim.
Conclusions: This kit is simply outstanding.
Though it sells for ~800 Yen more than a standard 1500 Yen HG kit (100Y
~ $1 U.S.), it includes the complete parts options for all three TG
variants. The parts fit, detail and
articulation (except the forward leg flexibility) are all exceptional. Mating pins, mold lines and ejector pin
marks are all well hidden, better in my opinion than the other HG GW kits. The biggest lacking this kit suffers from is
the painting guide, which is great for the TG III, but woefully inadequate for
the TG I or TG II. With light
researching, an accurate paint scheme can be found easily enough to overcome
this.
Ratings (for unmodified
kit):
Value: 10
Ease of build: 10
Execution of overall
design: 10
Detail: HG
Gimmick execution: 10
Weapons: 10
The BEST GW Hg kit!
My Gaggle of Geese:
Kneeling
With Dober Gun Kneeling
with Beam Saber TG Front TG Rear